What happens when a border closes and a lecturer is stranded 4,000 kilometers from the students he’s supposed to guide through the most important academic milestone of their undergraduate lives? This blog post answers that question with a firsthand, three-year account that reads more like a survival story than a teaching memoir. It begins conventionally enough — face-to-face meetings over dinner at a dining hall in Zhaoqing University, China, in 2019. Then COVID-19 hits, the author is trapped in Malaysia, and everything unravels. WeChat and QQ become lifelines. A university monitoring platform serves as a vital safety net, while naturally navigating the complexities of institutional oversight. In one of the story’s most gripping turns, two biotechnology students simply vanish — ignoring ultimatums, “failing” their thesis, then resurfacing months later in a twist the author himself still finds baffling. Beyond the drama, there’s real substance here: a lecturer teaching himself R programming from scratch just to keep his students’ statistical work rigorous from afar, and a “peer guidance and support” system built out of necessity that ends up working better than anyone expected. A late-stage crisis — when an examiner suddenly demands more “bioscience” content from students’ theses — shows how quickly things can go sideways even after years of lessons learned. This isn’t just a pandemic story. It’s a candid reflection on what a graduation thesis actually teaches — topic selection, project management, data literacy, writing discipline, and the nerve to defend your work — and how those lessons hold up even when the mentor isn’t in the room. For educators, administrators, or anyone rethinking remote supervision, this is a rare, unvarnished look at what worked, what nearly didn’t, and what the author would still do differently.
Author’s note: It took over 3 years, but I have finally completed the story on my remote graduation thesis supervision experiences. I thank my good friend and colleague, Dr. Xu Guang Ting for all his help in this endeavour. My gratitude to the leadership of Zhaoqing University for their exceptional decision of granting me the privilege to teach and supervise students online. Last but not least, I thank my 12 graduation thesis students for being good companions in this special learning journey. [As this is a rather long story, I have decided to publish the Chinese version中文版 separately.]
The length of this article prompted me to use Notebooklm (or Gemini Notebook now) to generate a video of the content. This is a sort of TLDR presentation.
On Campus Supervision of Graduation Thesis Students
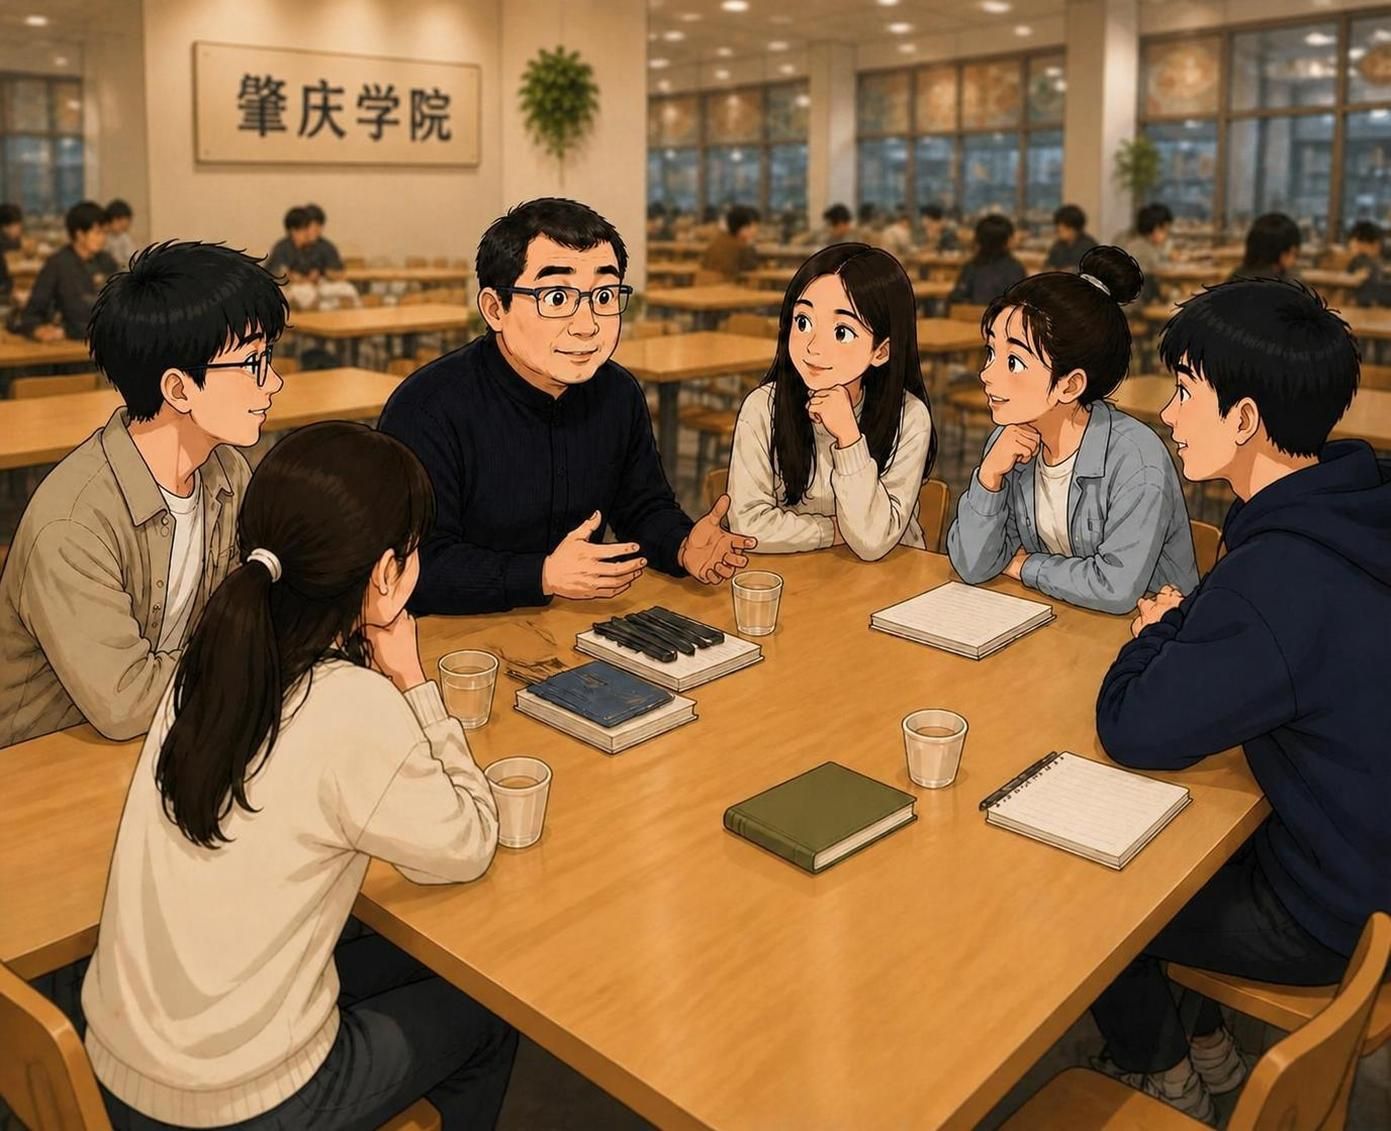
When I started my teaching stint at Zhaoqing University in March 2019, I was not assigned any graduation thesis supervision duty. By August 2019, when I went back for the new academic year, five students—three from the teacher training classes (Bioscience) and two from the biotechnology classes—were assigned to me. As I had taught these students in different subjects (the Bioscience students were in two different Professional English classes taught by me; the biotechnology students were in my management and then later in my marketing classes), it did not take much for me to get the students to start the ball rolling. The only difficult parts were to find a common “free time” and a suitable venue to have our weekly meetings (as mandated by the University).
Guiding five students physically on campus in 2019
As I was not allocated any office space, and it was a bit too complicated to book a meeting room for the weekly meet-up sessions—and because my small apartment was too small to fit in everyone—I had to look for a suitable venue for our weekly meetings. I discovered a relatively quiet area at the far end of the 3rd floor of Dining Hall Number 4 of our campus which had a few large tables. I would therefore arrange weekly meetings at this venue where my wife and I would go for an early dinner around 5:00 pm, and the meeting would be set at around 5:30 pm. Finding a suitable time during the day was difficult as the students were from three different classes with their own differing timetables, making it very hard for me to find a common “free spot.” I also remembered the advice from one of my Taiwanese colleagues that we should, if possible, meet students within the campus to avoid unwanted problems.
As I did not have any laboratory and my area of research in plant science would take too long for results to be observable, naturally I had chosen to take an interest in other areas of biological science for possible research topics for the students. With the help and guidance of my Taiwanese colleague, Associate Professor Dr. Xu Guang Ting (许光廷副教授), I learned to use moxibustion as a TCM treatment for my broken wrist, which happened in April 2019, and I would like my students to focus on this area. Each student was given a different area relating to moxibustion to work on.
The weekly meetings went on for around 10 weeks; by then (November 2019), the students were getting busy with their preparation for their final examinations near the end of the semester (late December 2019/January 2020). Little did I know that my physical interactions with my students would end abruptly after January 2020, thanks to the COVID-19 Pandemic.
Remote Supervision and The Associated Issues
On January 14, 2020, I left China to return to my home in Malaysia for the winter break/Lunar New Year. With the onset of the COVID-19 Pandemic, I was, like all my Taiwanese colleagues who went home for the winter break, not allowed to return to our campus. By March 2020, the University leadership had decided (in accordance with the national guidelines) to re-open classes via online delivery. However, graduation thesis supervision was put on the back burner, but supervisors were still trying to keep in touch with our students and check on their progress. The semester went by quickly as online teaching came with lots of issues that took a lot of effort on the part of both learners and teaching staff (as well as the technology team at the University).
By August 2020, the authorities in China opened the border selectively; my Taiwanese colleagues were allowed to return (but all who entered China were subjected to a long quarantine period). Sadly, as a Malaysian, the border remained closed to me! At the same time, students were allowed back on campus, but everyone had to adhere to strict COVID-19 prevention procedures. I was also given special permission by the leadership of Zhaoqing University to continue teaching online, and this meant graduation thesis supervision would continue remotely, too. Dr. Xu Guang Ting, who had yet to be assigned graduation thesis students, volunteered to be the co-supervisor for my thesis students. He arranged to meet up with the students regularly. By then, one of the Bioscience students had obtained a one-year break from her studies (she would continue in the next academic year), and hence I was left with four thesis students. By mid-semester, all third-year students were to embark on a six-week internship in the field of their studies. The two Bioscience students were in the teacher training stream; naturally, they were assigned to schools. While Li Min (LM), who was working on the effects of moxibustion patches, was sent to a city school, Xiao Ming (SM) was assigned to a rural school with poor communication facilities. The two Biotechnology students were also assigned internships in biotechnology firms (which by then, in the midst of COVID-19, were very keen to have these students). It was at this time that SM appealed to me to change the topic of her graduation thesis to that of rural students’ life science education to reflect her internship situation, where she could benefit most from the rural education environment. As Dr. Xu, who studied traditional Chinese medicine as a side interest, was very keen to see the results of LM’s work, and LM, being at a city school, had no problem communicating with both Dr. Xu and myself via WeChat. The same could not be said about SM’s situation. The rural school where SM was attached was very remote with a poor internet connection. As a rural trainee teacher, SM was surrounded by young primary students most of the time. She had to find a quiet spot with a reasonable internet connection and away from her students’ distractions to communicate with me via WeChat at all times.
The Disappearing Act of the Duo Biotechnology Students
Towards the end of November and early December 2020, all students on internships were to return to the campus to continue their studies. However, I received a message from Dr. Xu that the two Bioscience students’ attendance at his meetings was good, but the same could not be said about the two Biotechnology students who each only attended one meeting session in September 2020 with Dr. Xu and did not turn up for even a single session after that. They ignored all attempts by Dr. Xu to contact them. On my end, I also sent out many WeChat and QQ messages to these two Biotechnology students to report to Dr. Xu, but they did not comply. I also enlisted the help of the two Bioscience students to physically find and convey Dr. Xu’s and my messages to the Biotechnology students (both SM and LM confirmed that they had seen them on campus). These two Biotechnology students just refused to comply.
In early October 2020, my University had introduced a graduation thesis monitoring and management platform (VGMS platform 维普论文检测系统) on a testing phase. I was allowed to check this out. The VGMS platform tracks students’ and supervisors’ inputs and allows monitoring and appraisal of the students’ work as well as the decisions and inputs of the supervisors by the respective deans and senior academics. The systematic and time-sensitive procedures for the various stages of the thesis preparation and submission would mean that both students and supervisors would be forced to adhere to the schedule decided by the University to ensure timely and orderly completion of this academic process. However, for the Spring 2021 graduation thesis session, the use of VGMS was optional, on a trial basis only with a full implementation in the following academic year being considered.
In early December 2020, after many failed attempts (by myself, Dr. Xu, and the two Bioscience students) to get a response from the two Biotechnology students, I finally issued an ultimatum to the pair: “Either you make contact now (with me or with Dr. Xu) or else I will register a ‘fail’ grade for you both!” And I also asked the Bioscience students to verbally convey this message as well. One would have thought that any student who wanted to graduate would immediately spring to action. But not this pair of Biotechnology students. They continued to ignore the final warning. I then had no choice but to formally inform them that they had “failed” their graduation thesis. {The final submission of their thesis was not due until late April/early May 2021}.
In February 2021, out of the blue, I received a WeChat message (followed by a QQ message) from one of my Biotechnology thesis students. These messages were followed by a few more from the second Biotechnology student. The pair were anxious and desperately wanted to contact me. I made it very clear to them that, as far as I was concerned, they had failed their graduation thesis. I was busy preparing for the start of the Spring semester in March 2021. Dr. Xu informed me that at that stage, it would be best for me to supervise the two Bioscience students myself, with him backing me up in any administrative work related to thesis supervision. I was happy that both thesis students were progressing well. LM had already done the bulk of the fieldwork—getting volunteers from among female staff and students to try putting moxibustion patches at the “sanyinjiao” (三阴交) pressure points and recording their responses. SM, on the other hand, was busy collecting survey responses for her thesis work.
Data Collection and Statistical Analysis
In preparation to teach a Biostatistics class to Biotechnology students I had taught myself some fundamentals of R language from August to November 2020 (and learning R language helped me to relearn the subject better). From SM and LM I learned that all Bioscience students also took a course in Biostatistics which was similar to the one offered to Biotechnology students. In addition, all students had to attend classes on thesis preparation (which was taught by other colleagues). Hence, I had no issue with my supervisees’ background knowledge of statistical analyses. However, tackling the tasks of analyzing and, more crucially, interpreting the statistical analyses of the data collected would be much tougher to accomplish effectively unless, of course, one’s major is in statistics (or related fields). Thus, I took it upon myself (with my basic knowledge of R language) to analyze all my supervisees’ raw data. At the onset I set out to optimize the data collection method of both SM and LM so that we could render an easier path to import the data into R for analysis. We used Excel to do some of the raw data crunching and data cleanup, and I used R language to perform the required statistical analyses for both students. I also guided them with the interpretation of the statistical analyses. We used VGMS to help us keep to the timeline at all times.
The Resurfacing of The Pair of Biotechnology Students
May 2021 was a tense time for both graduating students and their thesis supervisors. This was because of the need to finalize the thesis, submit the work accordingly, and prepare for the defense of the thesis. Defending the thesis was perhaps the hardest part for most graduating students. More so if your thesis supervisor could not be physically present during the crucial 20-30 minutes of your presentation and question-and-answer session. Although the “hand-holding” work was done well by Dr. Xu, who was present at both SM’s and LM’s thesis defense sessions, I felt that my absence would dent the students’ confidence. In 2021 it was too complicated to do a Tencent Meeting session during the presentation and defense sessions of my two students. Missing these was a regret that I feel even today. I was elated to hear from Dr. Xu later that LM sailed past her thesis defense, while SM only needed some minor corrections.
Prior to the thesis presentation and defense sessions, all supervisors were obligated to be graders of theses from students other than their own. As an academic staff of the Biotechnology division of the School of Life Science, naturally, I was assigned to grade a great number of theses from Biotechnology students. My biggest surprise was to come… the theses of the two Biotechnology students whom I had failed were among the work that I had to grade. To be fair to all students whose work was graded, the University provided graders with a marking scheme that we were to adhere to rigorously. What surprised me most was how my two “failed” thesis students managed to work so fast on their theses (SM and LM took 3-4 months to gather the data and 3 months to get to the final submission stage). As both of these two “failed” Biotechnology thesis students worked on topics within bioinformatics (and there were other students submitting theses in the same field that I had to grade), I had to dig deep into my knowledge of bioinformatics (and read up a lot to catch up with the subject) in order to grade the students’ work effectively. When I compared my “failed” Biotechnology students’ work with the others, it was clear that the depth and breadth of their work were not on par. Nevertheless, I had to adhere to the marking scheme provided to me. After a thorough review and comparison with the work and grading of the other students whose work was on bioinformatics, both my “failed” Biotechnology students managed to scrape through but with a lot of comments and further questions from me. Interestingly, I was informed by Dr. Xu, who happened to be present during the pair’s presentation and thesis defense sessions, that both of them were thrown off guard by a few basic questions from an examiner. Nevertheless, the examination committee did finally decide to pass the duo. Dr. Xu later learned that the pair wanted to change the topics of their thesis but did not consult anyone formally until I had failed them! If they were to have their intention clearly explained to Dr. Xu (or yours truly) early on, we would have had no issue in releasing them.
In view of the experience I had with my two Biotechnology students, I filed a formal request to my University to implement the VGMS in the next cohort. I was happy to learn shortly later that my suggestion was accepted by the leadership. The implementation of the VGMS meant that in the next cohort, we would spot the “runaway thesis student” early, and interventions could be effected swiftly and timely. Moreover, data of all the steps and stages of the thesis preparation and submission process would be held on record where monitoring by various assigned senior academic staff would be effected to ensure adherence to procedures, quality, and timeliness (in the completion of tasks by both supervisors and students).
Learning from Past Experience Equals a More Systematic Supervision Regime
At the end of the Spring Semester of 2021, I was assigned (or rather randomly picked students from a ballot box, remotely via the helping hands of my colleague, the Academic Secretary of the School of Life Sciences) nine students (who all happened to be from the Bioscience field). The Bioscience student who took leave of her studies previously in 2020 was assigned to return to my supervision group. As there were still no signs of when I could return to China, I had made preparations to supervise all these students remotely. By then Dr. Xu had had his plate full with his own graduation thesis students, and it was inappropriate for me to burden him further.
For the next cohort of graduation thesis students being supervised by me, I decided that I should be more systematic in the initial workflow before the VGMS system took charge of the procedures and processes. I had implemented the following:
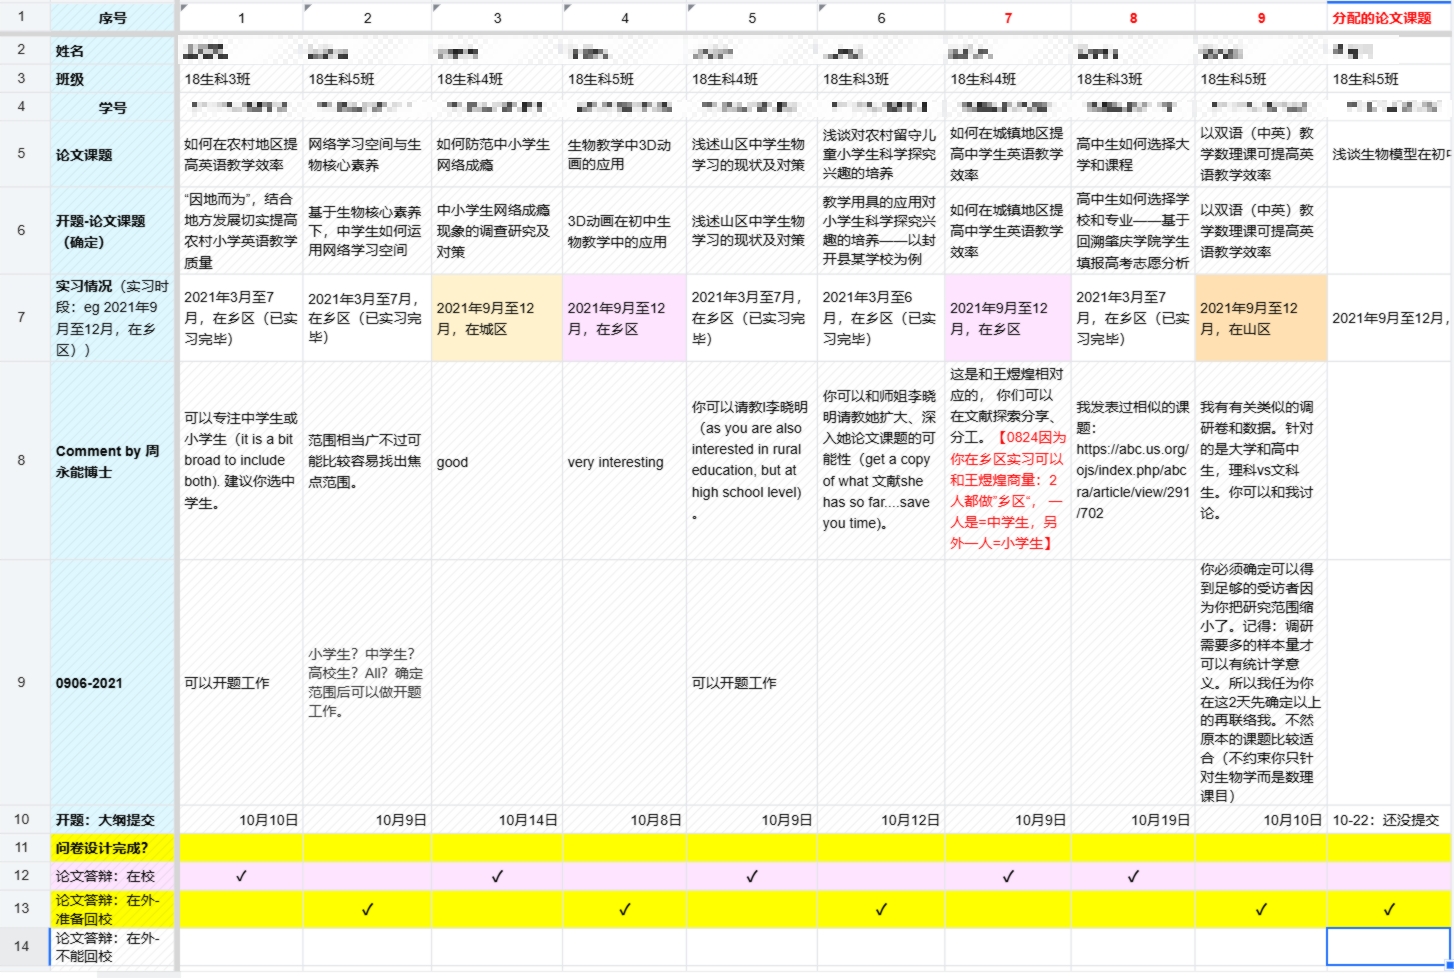
All students were to indicate their topic of interest (if any) in an appropriate online form which was visible to all students. I had “seeded” the form with possible topics that students could choose, but they were free to propose their own topics (subject to my approval). The students were given a deadline by which they should register their intended topics, after which I would assign thesis topics to those who did not respond in time. By doing this, I was being pragmatic; a student would be more motivated if she/he was to work on a thesis topic that was of interest to him/her. In addition, the research topics would have to be vetted by the Head of the Department (of Bioscience), and his approval must be secured before a student could commence work. Of the 10 students, six picked their own areas of research (with my guidance to finalize thesis titles that were academically appropriate). The remaining four students elected to select their research topics from the list provided by me. The “live” status form to track students
All my students were mandated to attend a special online lecture where I would (based on my experience with the previous cohort) spell out “what to do and what not to do” in the design of a research project, the data collection, the preparation of writing up, referencing, etc. In particular, I stressed the importance of quantification in survey-type research work. During this session, the supervisees also learned about the proper way to quantify their data and how to design effective data-capturing survey forms. All students were mandated to attend this special “what to do and not to do” of graduation thesis preparation
I had set up a meeting schedule mapping the various deadlines in the VGMS system. All my students were obliged to attend and present any issues that they needed resolving. This was to make sure that the required work at each step of the thesis preparation process (as structured in the VGMS system) would be completed on time. Prior to each meeting, I would finalize my monitoring work on each student’s progress and use “peer guidance and support” to ensure that anyone slacking would be identified and assisted (if needed) by her/his peers. Through the “peer guidance and support” effort, I made sure that students working on overlapping or related topics could exchange references found and assist one another. Peer guidance and support was made easy as all my 10 students were from the Bioscience field. Although they were spread between three different classes, the students would have, at some point during their studies, encountered each other in different subjects or during student activities. I was also able to identify among the 10 one particular student who was most approachable and had good leadership qualities as the unofficial leader of my thesis supervision group. (It was this kind of support that I counted on heavily to keep the morale of my students up at the later part of the process).
Uneventful 2021-2022 Cohort?
Learning from the operation of the 2020-21 cohort graduation thesis supervision, I ran a relatively strict regime. Any student who needed to miss a scheduled meeting was obligated to seek prior permission from me, and she/he was to watch the replay of the recorded session and do the required tasks as assigned by me. Luckily for me, all 10 students I supervised complied with this requirement completely. As all my supervisees were Bioscience students training to be teachers, all the crucial steps/stages of the graduation thesis supervision processes came under the purview of the Head of Bioscience of my School. The VGMS system made it compulsory for supervisors to obtain the approval of the respective Head/Dean to progress their students. The most crucial of all, of course, was the topic of the graduation thesis of each student. In my supervisees’ case, there were three students whose thesis topics were in the teaching and learning of English, one was on internet addiction by students, and one was on how university students selected their field of major. The remaining five worked on topics related to the teaching and learning of life sciences. With all 10 members of my group obtaining the Head of Bioscience’s approval without any further comments, my supervisees and I commenced the hard work swiftly.
Next, to ensure my supervisees could collect data effectively, I paid a lot of attention to guiding them in the design of their data-capturing survey forms. This had the direct effect of allowing the collected data to be analyzed without too much data-cleaning work and ensuring that correct and useful data would be collected. I also made sure that the supervisees collected references that were relevant and from verified sources and shared these with me. I also stressed the prime rule of any thesis work: avoid any form of plagiarism. I went on to share ideas on how to cite others’ work in one’s thesis. I also cited examples of pitfalls that the students should avoid and gave several examples of “good citation work” of their seniors for them to emulate. In addition, I demonstrated how one could effectively and efficiently integrate and synthesize knowledge, viewpoints, and conclusions by compiling key findings of related published work and then constructing a table and commenting and drawing facts from the said table. The VGMS system had an effective plagiarism checker, and all submitted work would have to pass this hurdle before it could be accepted. My prior experience with VGMS’s plagiarism checker had prepared me well to tackle this task, which had floored many a graduation thesis student in the 2020/21 cohort. To facilitate the supervision work, I requested the students to update the progress tracking form that I had set up on their respective internship situations (whether they were on campus, in town, or at a rural location) on a regular basis. This was necessary as the 10 students did not have their internship at the same time, with some doing it earlier (from March – July 2021) and some much later (September – December 2021). The tracking form also allowed me to know, at the last stage of the thesis preparation process, the physical location of each of my supervisees. This was to ensure that every one of my supervisees would be able to attend his/her graduation thesis defense.
As with the 2020-21 cohort, in order to have verifiable, correct, and presentable statistical analysis, I took on the task of using R language to analyze all my supervisees’ data. But prior to the statistical analytical work, each student would have to “clean up” their dataset accordingly so that it could be imported into R language. I spent a good deal of time helping each student to interpret his/her statistical analysis. Surprisingly, the writing-up process for everyone was very uneventful, and the supervisees definitely had learned to write in the correct format as stipulated by the University. The VGMS system also guided my supervisees each step of the way and, where there were issues, these were identified early by me, and rectification by the student concerned was relatively painless (to the student). As the final deadline for submission of their graduation theses approached, naturally some students took the pressure in their stride, while one or two required some moral support and extra guidance. The “peer guidance and support” system set up by me kicked into action, where my supervisees were able to draw on each other’s experience, resources, and encouragement to overcome difficulties faced. This was very important to my group of supervisees as I was physically over 4,000 km away.
Although I was located in Malaysia, my School’s leadership had endeavored to help me in my role as an examiner of graduation thesis of my colleagues’ students. I was given electronic copies of the thesis to grade prior to the presentation and defense sessions. The Chairman of the graduation thesis examination board made sure that I could view all the students’ presentations online via Tencent Meeting (including my 10 supervisees’). However, it was rather taxing for me to hear and view these presentations live over prolonged sessions. Nevertheless, I was able to grade the relevant students’ presentations (except for my own students, which were graded by one of my colleagues) without any issue.
However, when a senior colleague, during the question-and-answer segment near the end of the thesis defense session, passed a comment to one of my students who worked on a topic related to the teaching and learning of English at schools, it sent a huge alarm signal to me (and my supervisees working on topics in this area). The senior academic was of the opinion that as a student of Bioscience, he would expect the student’s research work would have touched on some aspect of life sciences. In my supervisees’ cases, all their thesis topics were duly vetted by me and approved by the Head of Bioscience before they commenced work. As students of education, there was no reason why they could not concentrate their thesis work on the teaching and learning of English. However, academic etiquette dictated that I should not hold any debate with the senior colleague on this and to accept the criticism and do the necessary. I knew that the student working on “how students select their university and major” had no issue as she had, on hindsight, luckily canvassed a large number of her interviewees from the School of Life Sciences (hence the connection to life sciences was established). The other four students had to do extra data acquisition work to fulfill the requirement of “Bioscience element” in their work. This was the time when the leadership of the unofficial leader (who fortunately was not affected) was called upon to pacify and smooth the nerves of some of the affected students. Those who were not affected then rallied together and helped their affected peers to work on the preparation for their addendum. I felt a bit helpless, being 4,000 km away and only able to provide my encouragement via WeChat!
After a few days, all four affected students managed to comply with the “Bioscience element” and resubmitted their thesis. In the end, all my 10 students passed! One general comment from the panel of examiners was: all my supervisees’ data analysis and presentation were good! One colleague even asked my consent to read a supervisee’s thesis for ideas for further research.
Learning Points and Conclusion
Supervision of graduation thesis work can be effectively done remotely provided there are established systems, procedures, and guidelines to handle the various processes.
But the most important point, I think, is the learning and training within the entire graduation thesis work and processes that students have to go through. Embarking on the graduation thesis work requires the student to hone the following skills:
The skills for strategic selection of a topic for the thesis: the student has to choose a topic of interest to him/her, balancing the reality of his/her internship environment to finalize a topic that not only is relevant to his/her interest but one that also falls into the field of expertise/interest of the supervisor. The critical and strategic thinking involved in this very first step of the graduation thesis work trains students to use all their accumulated skill sets for self-reflection, negotiation (with each other to avoid overlapping of topics), and communication (in this case via electronic means) with the supervisor to convince him of the appropriateness of their final topic selections.
The skills involved in organizing the graduation thesis work: the students have to be the project managers of their own projects. Although the VGMS platform provides an effective way for supervisors (and senior academic staff) to monitor students’ progress through all crucial steps, it is up to the student to organize and execute the required work in a timely manner. The students are their own “quality assurance managers” in that they are responsible for adhering to the University’s guidelines in producing thesis work that is up to the required standards and doing so in accordance with the timeline as specified by the VGMS system.
The ability to capture relevant data in a format that is statistically analyzable: the students must think through (with the guidance of the supervisor) an appropriate format of data capturing that would allow them to engage and communicate with respondents of their surveys. That means they need to work out suitable questions as well as answer selections that could render data to yield statistically meaningful results. The prep-talk session given by the supervisor was just the essence of the thesis preparation course, biostatistics, and writing skills course that the students had taken. The students individually must be able to translate the knowledge of these various sources into the final survey data capturing form that is actionable. Although the number-crunching statistical analyses were done using R language by the supervisor, the students needed to have the fundamentals of biostatistics to comprehend the output from R and interpret the results accordingly (guided by the supervisor).
The skills to compose the final submission: although the VGMS system and the University’s guidelines provided sufficient instructions for the composition of the final draft of the graduation thesis, the students must learn to write, to cite references, to extract and present results from the statistical analyses, and to synthesize new knowledge from their graduation thesis work. The drafting and re-drafting of the final version of the thesis compels the students to be attentive to details in order to comply with the required format. The communication back and forth between the students and the supervisor in the final preparation stage would really test the endurance of both students and the supervisor. This is more so when the supervisor could not be physically present and relied on WeChat and QQ as the conduits!.
The presentation and debating skills to defend the thesis: it is very daunting for a student to stand in front of the panel of examiners to present and defend her/his graduation thesis. In my students’ case, the lack of a physical presence of their supervisor to provide the reassuring support (in facial expressions and body language) would have a negative impact on their morale. Hence, I think my students had to rely on “peers’ moral support“ in this context. Their disadvantage in this context might have the positive effect of training them to endure the associated pressure and stress which would prepare them better to face greater psychological challenges at work in the future.
In view of the importance of the acquisition of so many skill sets that the graduation thesis work confers, the University’s leniency in dealing with “runaway graduation thesis students” still baffles me. The lack of breadth and depth of the work presented by my two “runaway graduation thesis students” was evident enough that the duo could not produce work of sufficient standing within a “gestation period” of around one-third of the other students. In my humble opinion, in view of the skill sets that a properly executed graduation thesis work could confer (as outlined above), the academic penalty for such “runaway” cases has a lot of room for review.
You do need to have the ability to spot turning points in any project of your endeavour. In my case I spotted the turning point to make little bulbs out of my daffodils/narcissus in test tubes. And my PhD supervisors made sure I scaled the most important turning point – the completion of my PhD thesis on schedule!
你确实需要有能力在你努力的任何科研项目中发现转折点。在我的例子中,我发现的一个转折点就是怎样使得试管培养的水仙花芽丛形成小鳞茎。我的两位博士导师确保我完成了最重要的转折点:就是如期完成博士论文!
About 35 years ago, having cracked how I could make a lot of daffodil shoots in test tubes (that’s another story!), I was faced with a great hurdle that for the life of me I had no idea how to tackle. How could I turn these shoot clumps into little bulbs for planting in the field? After all, my PhD’s goal was to produce a complete protocol from multiplying massive number of daffodils/narcissus shoot clumps in test-tubes and getting these growing ‘normally’ in the field. Based on literature reviews, I knew that plating shoot clumps had been successfully done by other researchers. But this had two major disadvantages:
There would be a danger of these shoot clumps not acclimatizing well when planted out in the glass house. 25 – 30% casualties would be “normal”.
These shoot clumps were behaving like young narcissus seedlings and would need up to five years to grow to flowering stage.
My late supervisor, Dr. Barbara M.R. Harvey suggested I should look at other plant models in tissue culture for inspirations. The light-bulb moment came when I had a chat with Dr. Nikki Evans on how she got her potato shoots in test-tubes to form small tubers. Evans used high sugar content in her culture medium and I went along this line. A few months later, I was elated to see little bulbs (which I termed ‘bulbils”) formed in my test-tubes given high dose of sucrose in their culture media. That was the turning point of my PhD and 6 months later I submitted my thesis…and the rest as they say “was history”!
Narcisus shoots in various stages of forming bulbils. From left: Starting with single leaf with basal plate tissue; after 3 – 4 weeks of culture duration signs of bulbil formation were clear; after 6 – 7 weeks a bulbil (about 1 cm in diameter) was formed; after 10 weeks of culture the bulbil had grown to be around 2 cm in diameter, the equivalent size of a one-year-old seedling. [Photo’s copyright: Dr. Chow Yong Neng]For this part of my work I am indebted to Dr. Evans for her generosity in sharing her ideas.
I owed it to my two supervisors, Dr. Barbara Harvey and Dr. Christopher Selby for putting their feet down shortly after I had completed the “bulbils” experiment by stopping me from doing any more work in the lab (they literally banished me from my lab!) and by pushing me to write my doctorate thesis which I completed about 6 months later! This was the most important turning point! My research project goals were attained, but my doctoral studies goal was still not reached. I had to write, submit and defend my thesis (successfully) to earn my PhD!
A few months after that (in December 1990), I was conferred the degree of Doctor of Philosophy by my alma mater, the Queen’s University of Belfast. Shortly after, I left Belfast to take up a post-doctoral research officer post at the National University of Singapore.
It was around late 1991 that I received the great news from Dr. Harvey, she wrote in an email: “Chow, some of the “bulbils” that you had planted out in mid 1990 are flowering!”
This was exciting news indeed because:
it proofed that my bulbils, after going through the “stressful” process of my protocol were not any different from those multiplied conventionally;
of more significance is the fact that this meant my protocol had cut the “shoot clumps/seedlings to flowering bulb stage”by at least 3 – 4 years!
I wished I had the chance and resources to carry on with this work to collect more data on this observation but disappointingly this was not the case.
In research work, you do need to have a keen eye to spot trends & changes but what you need most is the guidance of experienced researchers. I was lucky to have both! The keen eye helped me to spot the resemblance between the potato tuberization process and the bulb formation of narcissus/daffodils. The guidance of my supervisors ensured that I scaled the last but most crucial turning point of my PhD journey. They put a stop to my laboratory work and made sure that I stuck to the PhD research schedule (and more importantly, my scholarship tenure) to compose and submit my PhD thesis way before the last of my scholarship cheques was issued!
If you are interested, a brief introduction to a paper published by my supervisors and I have just been written & published in Kudos by me.
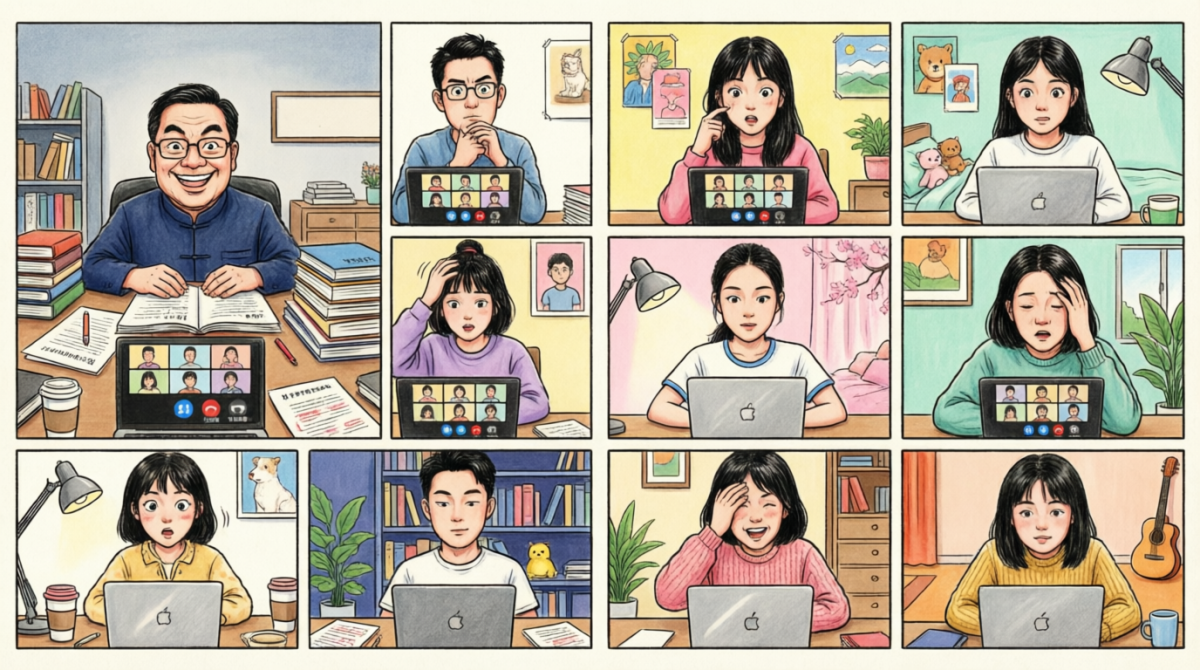
Someone who obviously never taught a single class commented that “teaching online is easy”. How wrong this person is? Check out my sharing!
It is definitely not a piece of cake to teach online! I know. This is because I had taught for over thirty months online.
网上教学绝对不是一件轻而易举的事! 为何我有此见解?这是因为我在网上教了三十多个月。
I was (until the end of July 2022) engaged as a full time teaching staff of Zhaoqing University, Guangdong Province, China (ZQU). I came home for a short winter break in January 2020, well “Mr. COVID-19” messed up a lot of lives and things, including my return from Malaysia to teach in China! In this rather long post I try to share my own experiences and learning in conducting delivery of classes online (and supervision of students’ graduation thesis work remotely in Part 2).
With the new semester fast approaching, in late January 2020 I received instructions from the International Office of ZQU to NOT return to campus. I guess we were luckier than most as I was able to cancel my wife’s and my AirAsia tickets on time to get a refund. By late February 2020, all my Taiwanese colleagues who had gone home (Taiwan) for the winter break and yours truly were getting anxious. One of our China colleagues, Mr. Yan Dan Feng was even stuck at his home town near Wuhan, the epicenter of the COVID-19 outbreak. We all really did pray from his (and his family’s) safety!
Finally, in early March 2020, with students and many staff not being allowed to return to the campus the leadership of ZQU finally received the green light from the power that be to allow all classes of the new semester (Spring 2020) to be delivered online. The scrambles for gears and internet bandwidth began at every academic’s and student’s household.
A shaky start to my online teaching class 我的在线教学课程的一个不稳定的开始
It happened that both Mr. Yan Dan Feng and I were assigned to teach the same course (管理学概论 – Introduction to Management Science) to two different classes. To make life easier for both of us, Mr. Yan and I had decided to merge the two classes (luckily the two classes’ respective timetables did not clash). I would be doing the lecturing while Mr. Yan would be working behind the “scene” to trouble shoot and observe students’ performance. Prior to this, with the help of the class leaders (yes we did have class monitors班长; class learning committee members学委; and class discipline committee members纪委) we had sorted out the online chat groups for classes in the platforms described below. So communicating with our students was more or less settled, so we thought!
Locations of lecturers —- one in Subang Jaya, Selangor, Malaysia; one in his hometown close to Wuhan in China. 讲师所在地点: 一位老师在马来西亚雪兰莪州梳邦再也,一位在靠近中国武汉的家乡。
Locations of students —- in their respective homes, scattered throughout Guangdong Province. Some would be in cities or towns with good internet connections while a good number would be at their home villages remotely located (internet connection and bandwidth were issues). 学生所在地: 在各自的家里,分散在广东省各地。一些人住在有良好网络连接的城镇,而很多人则住在偏远的家乡。(互联网连接和带宽可能具有问题)。
Online teaching platforms —- DingTalk (for live broadcast), Rain Classroom (a PowerPoint add-on from Qinghua University, as the in-class interaction engine), and QQ Group Chat (as the backup live broadcast platform). While WeChat remained the only direct link between the class leaders and the lecturers (we did not want the rest of the students onto this WeChat group to complicate matters), the rest of the class had to communicate with the teaching staff using DingTalk (backed up by QQ Group Chat). We did have another option: Tencent Meeting (腾讯会议) but this platform was a bit more complicated for me to use. So we ruled it out. 在线教学平台:钉钉(直播)、雨课堂(清华大学PowerPoint插件,作为课堂互动引擎)和QQ群聊(作为备用直播平台)。虽然微信仍然是班长/学委和老师之间唯一的直接联系方式(我们不想让其他学生加入这个微信群,让事情变得复杂),但班上其他人必须使用钉钉(QQ群聊为备用平台)与教师交流。我们确实有另一个选择,腾讯会议,但是当时我们觉得该平台的操作是有点复杂。所以腾讯会议被排除了。
The first class was chaotic to say the least. The first 30 minutes of class was “eventless”. We started a few minutes late as my teaching partner and I had to do a headcount of the number of students who signed in on our two classes. Luckily DingTalk allowed the “merging” of the two class groups into one for direct broadcast of my lecture. Hence we saved a lot of work in this merging so that my teaching partner could “supervise” the students and monitor them while I concentrated on the delivery.
Then our trouble started: some of the students reported that they were unable to get a good connection to DingTalk and on my end, with my own monitoring, I was informed by DingTalk that the connection I had was shaky. Thus collectively, Mr. Yan and I (with the help of the leaders of the two classes) had to inform our lot to “switch to QQ Chat Group”.
So we continued on QQ Group Chat direct broadcast (it was more like video group chat). The thing was, on QQ unlike DingTalk, I could not mute the microphones of the students. Despite Mr. Yan’s urging at the “back” of the online class for everyone to “mute your mic”, during the 90 minutes class, we had many instances of interfering sounds: door slamming, people talking, traffic noise. It was to be expected as our students were all stuck at home, some would have to share facilities with siblings etc. Compound this issue with the fact that not all students were having access to stable and good internet connections and most had to use their mobile phones to attend classes.
Nevertheless, we were still able to carry on with our class. Then our next major trouble started!
尽管如此,我们仍然能够继续上课。然后我们的下一个大麻烦开始了!
One of the female students decided to read her Chinese literature lesson out loud in my online class. Reading out loud is one way of learning Chinese literature but one would be well advised to do it when one is in solitude! So we had 80 students in the online class, 79 of whom was tuned in to my class with one blabbing away and “fighting” with me for the attention of her course mates! Despite my repeated requests to my students to “check your mic and mute your mic NOW“, the blabbing female student was not listening and she continued! It took the combined efforts of Mr. Yan and our class leaders a good 15 minutes to locate this “blabbing” person! So my “reserve” platform was not a viable alternative after all!
At that time (March 2020) Rain Classroom did not have a working live broadcast function, and I should have used Tencent Meeting (腾讯会议) as the backup. Lesson learned!
当时(2020年3月)雨课堂还没有实时直播功能,我应该用腾讯会议作为备选平台。我又上了一课!
In addition, March 2020 was the time when all educational institutions in China (from primary all the way to tertiary institutions) were teaching their students online. Bandwidth and other internet resources were stretched to the limits. Hiccups were to be expected. But true to the efficiency in which China technology companies were operating, most obliged to contribute during the nation’s critical needs and solved most technical glitches effectively. Hence within a few days most of these hiccups were more or less ironed out.
August 2020 – the return of staff & students on campus, but NOT ME! 2020年8月-教职员工和学生重返校园,但不包括我!
It was August 2020. All my Taiwanese colleagues received the order to return campus (subject to quarantine measures — this was a nightmare for many at the start, being “caged up” for weeks etc.). By then, my Zhaoqing City resident permit had expired. I needed a special letter of invitation from the provincial authority to get an entry visa. That took over 10 weeks to obtain. When this letter finally arrived, my rush to the Kuala Lumpur China Embassy’s visa centre proved to be fruitless – the nice manager at the visa centre advised us that the China authority were closing the boarder and even if we could get our visa, there were few flights (that cost at least ¥9,000 or around MYR5,625, but mostly in the ¥35,000 range for chartered flights) available. So I had to break the bad news to my colleague at the International Office of ZQU taking care of my case, Ms Zeng. All her great efforts in rushing around and chasing the special invitation letter for me was wasted!
I was fortunate to have very accommodating and kind leaders at my School of Life Sciences. The leadership took up my case to the power that be at ZQU and convinced them to grant me the privilege of being the only academic staff (one out of 2000) to be allowed to continue to teach online. Of course there were many rules /arrangements that I had to adhere to. Some of these were:
All my online classes must be delivered at the assigned classroom on campus and students must attend in person (that is, students must gather at the assigned time and venue as per ‘normal’ classes) 我所有的在线课程都必须在校园内教务处指定的教室授课,学生必须亲身到课室上课(也就是说,我的学生必须按照“正常”课程在指定的时间和地点上课)。
My School must arrange for another staff to be in attendance who would supervise my students during class (监督老师). I was delegated the task of find volunteers to fill up this role. Luckily the four Taiwanese colleagues at my School volunteered to help out and they enlisted other staff to back them up too. 我院必须安排另一位教学人员来监督我的学生上课(监督老师)。我被委托寻找志愿者来执行这个责任。幸运的是,我院的四位台湾同事自愿帮忙,他们还代我招募了其他教学人员来支持他们。
I must provide an online delivery plan to my School for endorsement and to seek final approval from the Academic Affairs Office (教务处). 本人必须向我院提交网上授课计划,以供教务处审核。
At the end of the semester, I must submit a report on each of the classes I taught online to the Academic Affairs Office via my School. 在学期末,我必须通过我院向教务处提交一份关于我所教的每门课的报告。
For practical/laboratory classes, I must find a suitably qualified colleague to run these classes on my behalf. 对于实践/实验课,我必须找到一个合适及合格的同事来代替我来运行这些课程。
For any classes with final examinations, the students must sit for the examination physically and thus I must find a colleague to grade the examination scripts on my behalf. 对于有期末考试的班级,学生必须参加纸质考试,因此我必须找一个同事代替我评分试卷。
I fully agreed and endorsed the Academic Affairs Office’s views on the conduct of my online classes. My students’ learning experience must not differ too much from “truly” face-to-face delivered classes. In shorts, they must not be disadvantaged on my account.
With the mandate from my School and ZQU, I then set about re-adapting my lectures to ensure that I had a fair chance of fulfilling (surpassing) the basic requirements laid down for me to deliver my classes online.
Adapting face-to-face presentation for online classes 调整面对面演示为在线课程
One major flaw of online delivery compared to face-to-face classes is the lack of a “feedback” from your students. If you cannot “see” and “hear” them, it is very hard to gauge your students’ engagement and attentiveness. The presence of my colleague as class supervisor (监督老师)would just ensure that there were discipline in the class. I would need to find ways to engage my students. If not it would be easier for them just to watch a pre-recorded video of my lectures!
The inventors of Rain Classroom from Tsinghua University must have heard the collective prayers of many teaching staff like yours truly. They invented an add-on to foster in-class engagement for presentation slides that can also be adapted for online delivered classes. This add-on, Rain Classroom was easily installed (on PowerPoint as well as WPS) and more importantly was very user-friendly.
At the end of each class, the leaderboard would be posted in the group chat showing the top 3 scorers of the in-class quiz along with a link to the lecture slides. 在每节课结束时,我会将领导板贴在小组聊天中,显示课堂测验的前3名得分者,以及与讲课幻灯片的链接
I therefore set out to add at least four but mostly 5 – 6 in-class quiz questions in every lecture. I made all these quiz questions carry marks towards the “class participation and usual grade” (班上互动和平时成绩)segment of the final result. To excite the students a bit more I even, for some of my classes, put up “hong bao – 红包” – a small red-packet of e-money for the top scorers for every session. Rain Classroom would generate these data at the end of each class with a chart showing who were the top three scorers of a session. I would post this data to our DingTalk chat group at the end of each lecture.
This “leaderboard” gave an element of competition and thus help to gamify my lectures a little. The most important thing was, with these set up, I ensured some sort of engagement from my students. In addition, these in-class quiz question and the scoring also helped in making sure students were learning progressively and we were not relying on one final examination to verify the learning attained by students (a practice that I, as an educator would try to avoid if possible). Rain Classroom also has a very effective way to log in students’ activity. Hence I would require all students to log into system using a link that I would provide at the start of each class. If you are not signed in, you will be considered as “absent”. Of course in a few odd cases (students forgot to bring their mobile phone to class; mobile phone missing / damaged) I would take note of the class leader’s verification and marked this lot as “present”. However, this lot would not be able to take part in the in-class quiz (and was destined to lose the marks for these too).
The “randomness” in the appearance of the in-class quiz questions also served one good purpose: students would have to pay attention as they would not be forewarned when my question would spring up. As the duration for answering these questions was 2 -3 minutes on average, looking up the answers on the internet would not be facilitated. With these in-class quizzes I achieved one thing that mattered most – keeping students on their toes, well most of the times!
So within a couple of lessons all my students taking my classes online learned the drill 所以在几节课之内,所有上我网课的学生都学会了以下几点 : –>
Charge up your mobile before class; 上课前给手机充好电;
Make sure you have your mobile phone with you when attending my class; 上课的时候一定要带着手机;
Log into Rain Classroom before the start of each class; 在每节课开始前登录雨课堂;
Pay attention as the in-class quiz question could come out at any moment! 上课时必须注意,课堂提问随时都有可能出现!
Although we only needed the class leader to log into DingTalk on the classroom PC to ensure that my live broadcast was projected to the large screen for everyone’s viewing, other students could also log into DingTalk during class to communicate with me (and the rest of the people who had signed in) .
One of the best features of DingTalk is its ability to record and archive all online classes (if one chooses to do so). I would not mind letting my students re-watch the recorded broadcast as some of the points I raised might need a student to look at it a few times to grasp. The recorded classes would also ensure that students who took leave had a chance to learn what they missed out (of course they would not score marks on the in-class quiz). So at the end of each lecture, I would publish my recorded lecture and post the relevant link to the class’s DingTalk group.
Unlike some of my fellow educators, I have no issue for my students having a copy of my PowerPoint presentation used in class. Rain Classroom has a function that I could “enable” to ensure that my students could review the lecture presentation slides. This feature coupled with the recorded class lecture would help student in their revision immensely (how I wish I had these during my student days!). These same features also enabled students who were unable to attend my class, to view the re-play along with the presentation slides so as to catch up with the course.
Tools and Gears for online delivery of classes 在线授课的工具和设备
I knew back in May 2020 that the most important gear that I had to procure was a semi-professional microphone. The interferences picked up by the cheap old mic were just too much to bear. But at the height of the Movement Control Order in Malaysia (where there was almost a blanket restriction on movement of people nationwide for weeks), getting geared up even with online purchasing was a bit challenging. But I did mange to get a reasonably good microphone that has done a good job in filtering out background noises.
早在2020年5月,我就知道我要买的最重要的设备是一个半专业性的麦克风。廉价的旧麦克风所带来的干扰实在太大了。但当时马来西亚是处于“行动管制令 – Movement Control Order” (几周来几乎对全国范围内的人员流动实行了全面性的限制),即便是在网上购物,也是相当困难的。但在“行动管制令”放宽后我确实得到了一个相当好的麦克风,它在滤除背景噪音方面做得很好。
The camera that came with the laptop was another issue. It was not versatile enough to give a good view of me for my lectures. Luckily my son’s ‘hand-me-down” Logitech webcam came in handy.
As I had to “see” and ‘hear” what my students were seeing and hearing at their classroom in China, I knew that I would have to set up another DingTalk account on my old laptop. I would run DingTalk simultaneously but to avoid the “echo and feedback” effects I had to use a headphone to listen to my own live broadcast. The time lag was around 10 seconds for my live broadcast to reach my students in China. This served me fine in my monitoring of my own online classes in a “live” manner.
For communication with the class monitor (班长) and/or class learning committee representative (学委), I would have a direct chat line opened with one of these class leaders so that they would be able to alert me of any issues while the live broadcast was going on. Thus I would have to monitor WeChat too during class.
As all the classroom’s computer, projector and sound systems were kept in lock and key, to make life easier for my class leaders, I had, at the start of each semester, sent out an “SOS” message to all my teaching colleagues, alerting them of the locations of my classes. I sought out their help to, if they were having classes nearby, unlock these teaching gears for my class leader(s) for them to set up the PC, projector and sound systems before the start of each class. The “show” would commence as soon as I receive a “all ok” signal (in this case just a “2”) from one of the students.
Needless to say, not every class could proceed smoothly, technology and people had a way in messing up plans. One of my classes was late in the evening, and in one of the sessions my class monitor could not find a staff member to unlock the teaching gears (and that was the day when the “supervising staff” was not at the class early). It took my “SOS” call to my School’s academic administrative colleague to send someone to the rescue! There were also times when either the PC or the projector (or the sound system) or the internet access was not behaving properly. But credits to my different class leaders in different classes, they somehow managed to get these systems working again in good time.
So in every live broadcast lecture I would be: 所以在每一次直播讲座中,我都会:
Hooking up the PowerPoint software with Rain Classroom to ensure that the class interaction will be presented and students’ responses were captured (and graded). 将PowerPoint软件与雨课堂连接,以确保课堂上的互动将被呈现,学生的反应将被捕获(并进行评分)。
Looking at my PowerPoint presentation, which was often set to “presenter mode”. 在另一个视频看我的PowerPoint演示文稿,它经常被设置为“演示者模式”。
Ensuring that the PowerPoint presentation screen was captured by DingTalk so that it could be projected in my classroom in China. 确保PowerPoint演示的屏幕被钉钉捕获,这样它就可以在中国我学生所在的课堂上投影。
Checking and ensuring that my sound and video streams were reaching my classroom in China on my “old” laptop. 在我的“旧”笔记本电脑上检查并确保我的声音和视频流能到达我在中国的课室 【监控我学生所看到-听到的视频】。
Communicating via WeChat on my mobile phone with my class leader, he/she would use this channel to alert me privately of any issues during class. 在我的手机上通过微信与我的班长/学委沟通,要是有需要,他/她会用这个渠道私下提醒我在课堂上的任何问题。
Looking at the Rain Classroom screen to monitor the signing in of my students to ensure everyone who was supposed to attend had signed in (because if they were not signed in to Rain Classroom, they could not participate in any of the in-class quiz questions, and so would score no marks for this class!) 查看雨课堂的屏幕来监控我的学生的签到情况,以确保每位应该参与的同学都签到了(因为如果他们没有登录雨课堂,他们就不能参与任何课堂测试问题,所以得不到这堂课测试的分!)
Periodically checking DingTalk’s group messaging section to monitor messages sent to me in-class by my students (and to respond accordingly). 不时检查班钉钉群群聊部分,以监控我的学生在课堂上发送给我的信息(并相应地回应)。
Mobile Phone view of my online class: I had to constantly monitor the interaction section in order to respond to students’ in-class communication.从手机上检查我的在线课堂:为了回应学生的课堂交流,我不得不不断地以手机监控钉钉互动部分。
So there you are, I had to monitor at least six different screens for sound and video! Most were things that a person delivering face-to-face lectures would not have to worry about! All these constant (and at times simultaneous) monitoring and keeping alert were very taxing on my energy to say the least.
On top of that, I had to be aware of my own internet connection and bandwidth (and power supply) which to the credit of these utility suppliers in Malaysia, I did not face any cut in services during any of my classes over the 30 months period. I did had a couple of incidences when my “better half” accidentally dropped a metal mug cover and the lid to a cooking pot very near the closed door of the room where I had my live broadcast. My students nevertheless did not complain, a consolation perhaps?
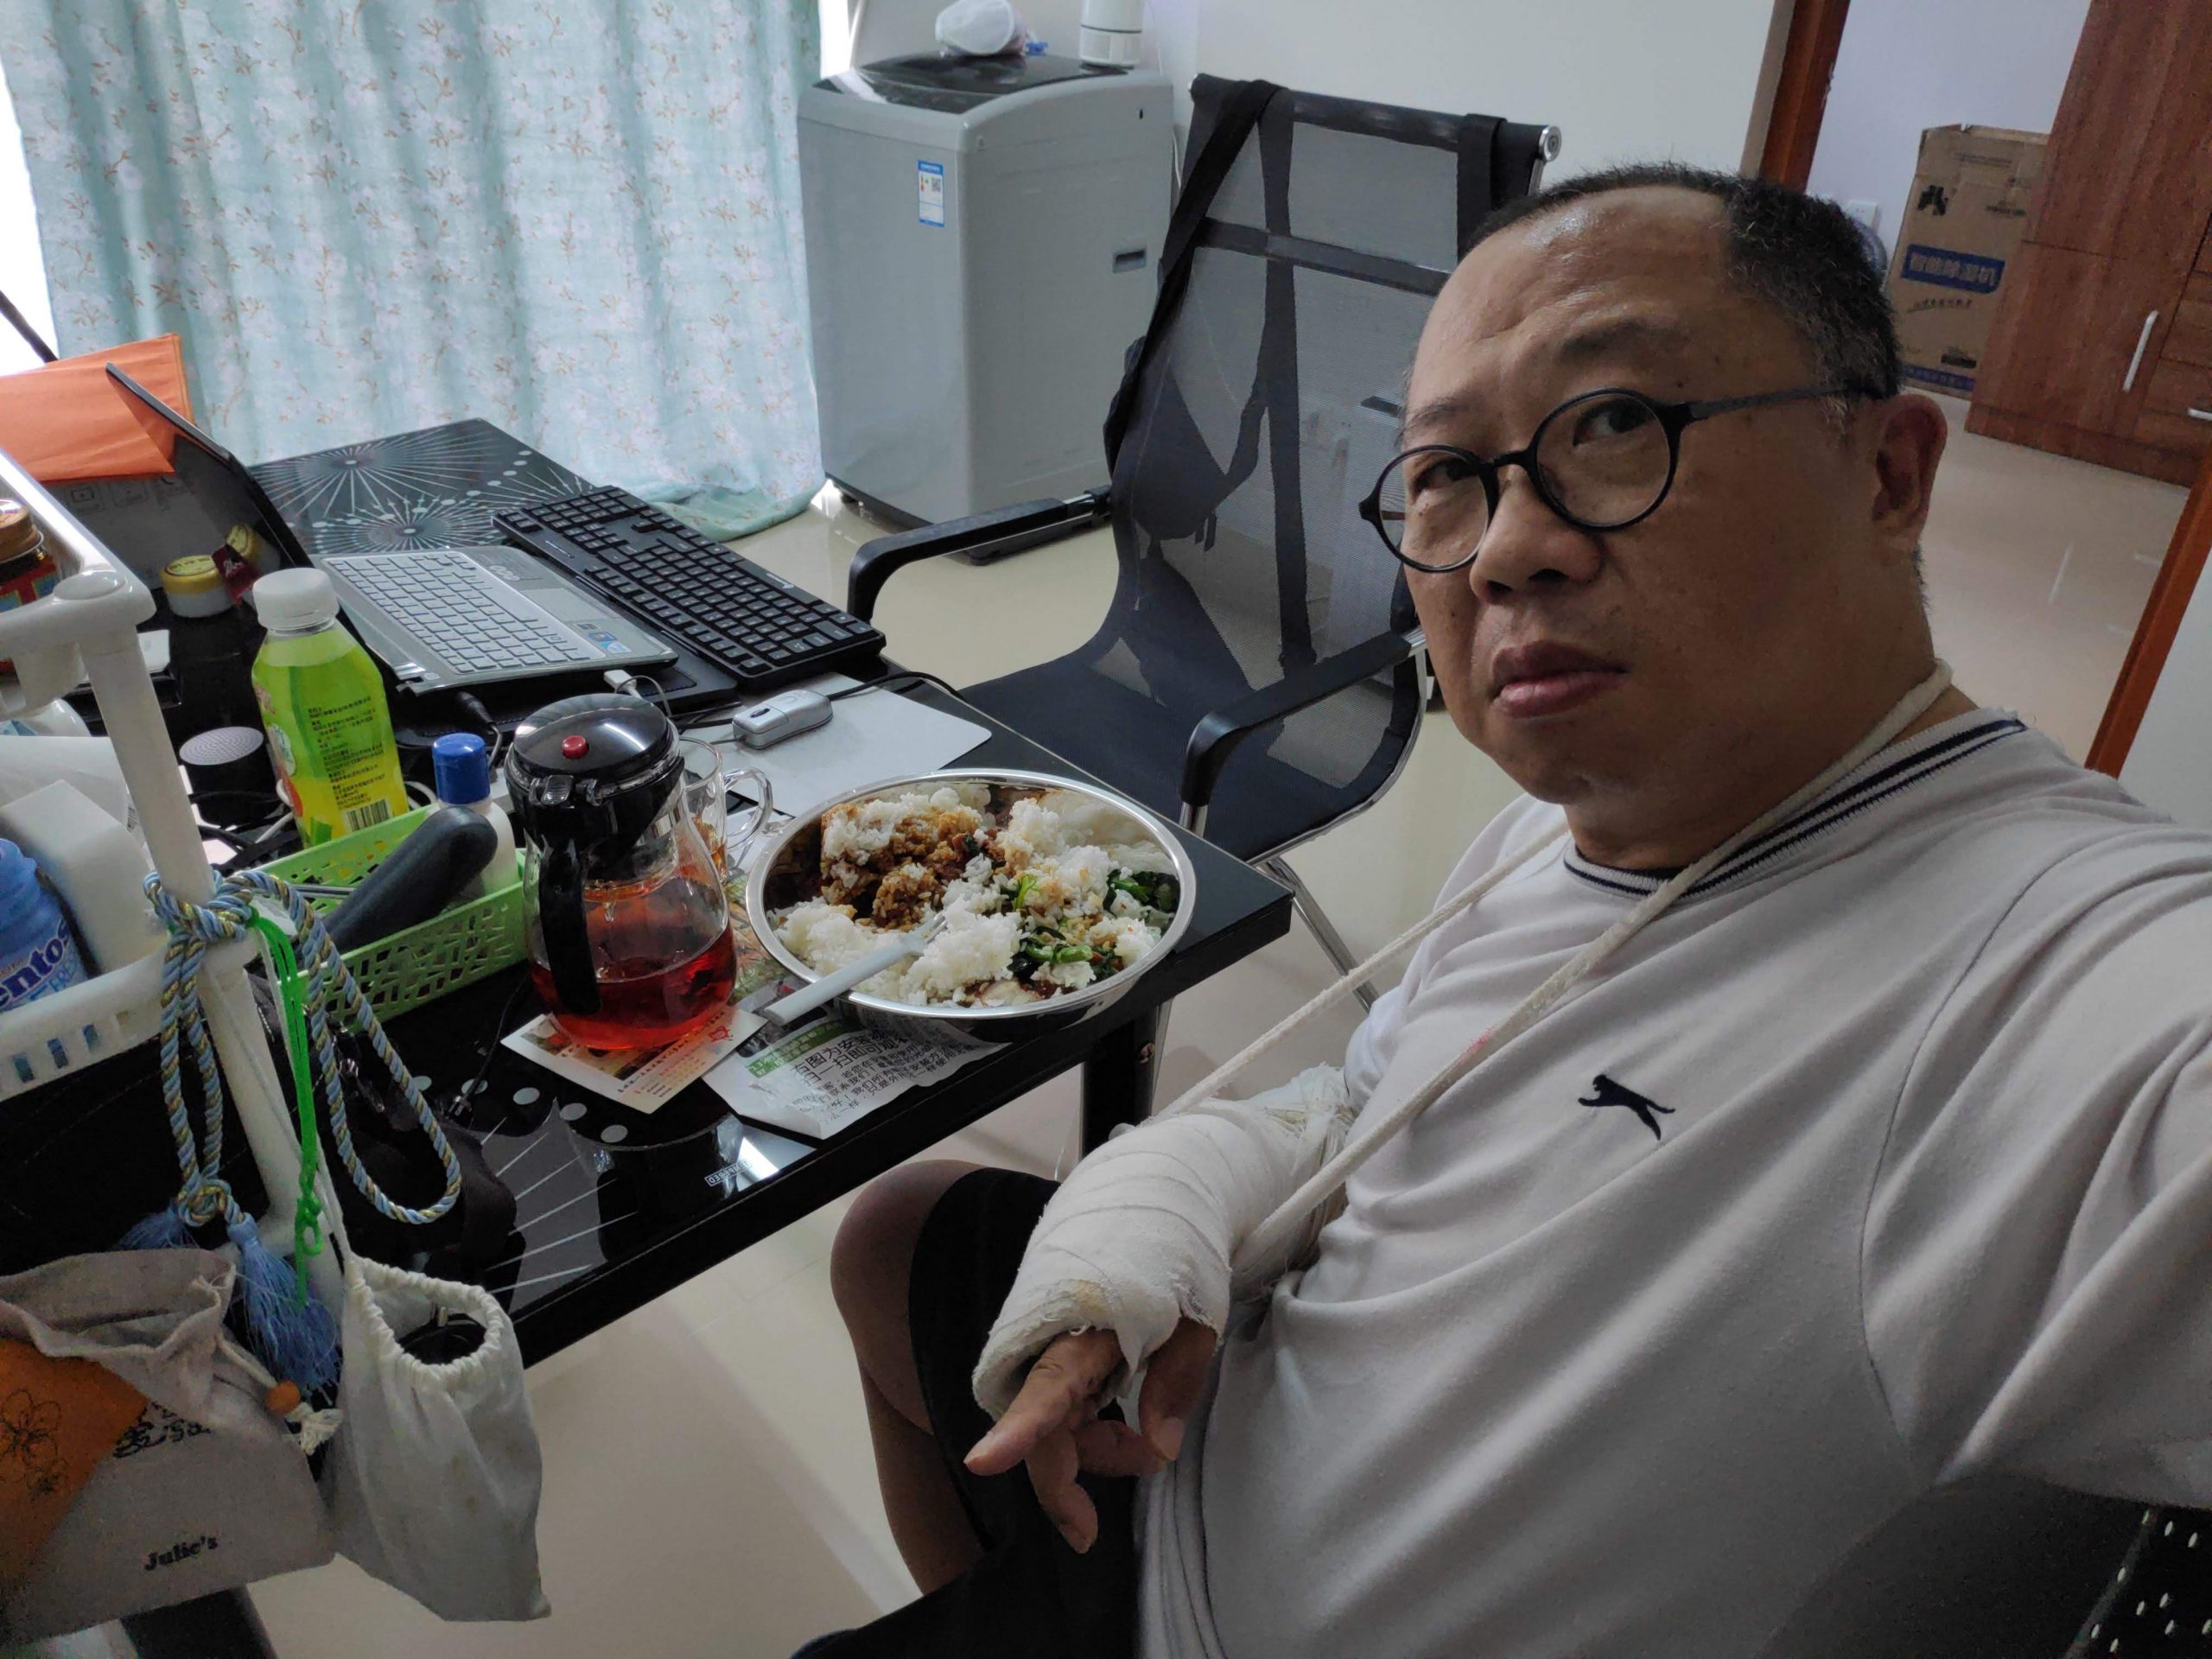
Even before the online teaching stint, I had already put almost all of my assignments and coursework on the “online submission” mode. This was because I had a fall while pushing my electric bicycle up a ramp on campus on April 25, 2019, this had resulted in a broken right wrist and I could not even hold up a single piece of paper for days.
April 25, 2019 was a bleak day, Dr. Chow YN broke his right wrist in a fall. That prompted him to think of ways to minimize handling of physical papers – so online assignment submission was adopted! 2019年4月25日是一个倒霉的日子,周永能博士在一次摔倒中摔断了右手腕。这促使他想办法尽量减少对实物论文的处理——所以采用了在线作业提交!
At that time my application of online submission initially was a bit crude (students emailed their lab reports shot on mobile cameras to me for grading). But I soon learned, to my great advantage later on, to use wen-juan-wang问卷网 (an online survey platform that could handle marking/collecting/compilation of data/upload of documents etc.) coupled with QQ documents to lay out readings and other assignment content/questions to run my online assessment system rather efficiently and effectively.
QQ docs sharing feature was often used to share assignment content/reading. In this case, after reading the content, students were to proceed to Wen-Juan-Wang to answer the assignment questions. A link was provided for checking the submission status too. QQ文档共享功能经常用于共享作业内容/阅读。在这种情况下,在阅读完内容后,学生将继续到问卷网回答指定的问题。我还提供了一个链接,让学生用于检查提交状态。
Students could attempt quizzes online that would often be graded by the system immediately so that they could re-attempt (I usually set a maximum of 3 attempts) to improve their grades. For some assignments, students would upload their papers onto the platform where I would download these papers, grade them (with comments) and return these papers to students (via a selection of online storage platforms in China such as Tencent Drive, Baidu Cloud, Aliyun Drive) with my feedback, comments and manual grading. For group assignments, I would just post the graded papers on DingTalk chat group for students to download.
The beauty of online submission /online quizzes is that there would be a paper trail. The lecturer could easily assign deadlines and for quizzes the number of attempts as well as the duration of each attempt could be customized. I even set up a link for students to make use of Wen-Juan-Wang’s feature of letting students check the status of their own submissions (thereby nullify the work needed on my part to respond to such requests!).
With the online submission framework, I was able to monitor the status of submission as the deadline came closer to remind and “chase” those who were still lagging behind. Putting this status up in DingTalk chat group had one great advantage: I could use peer pressure to “force” the “usual suspects” (yes, in each class there would be at least one such individual) to comply. As almost everything of this framework was “transparent”, I minimized the chances of students giving lame excuses for their not submitting their work on time. Unlike hardcopies of assignment papers, I always had a copy of each students graded work. This made reviewing of students’ performance for the end-of-semester final grading a lot more efficient.
The video above was captured by my kind colleague, Associate Professor Xing Zhi-Hang (郉志航副教授)when he was supervising my “Professional English” class. Apart from the fact that my physical self was not at the podium, everything else “looked” and “sounded” not much different from a truly Face-to-Face class. Personally I only realized this fact after Dr. Xing sent me this clip. I knew then at least in this aspect, my students were not disadvantaged much!
In the 2021 spring semester (Mar – Jul 2021) I was assigned to teach “Biostatistics 生物统计学” along with Professor Su Jun-Kui (苏俊魁教授)who taught his class in the Face-to-Face mode. As the subject had a compulsory final examination element and the two classes were to take the same paper, it gave a very good opportunity for me to compare if the teaching-learning processes of the online class differed much from the Face-to-Face version. In our case, the composition of students of the two classes were very similar. They signed up based on the time table slots available (as such the academic background of the students for both classes were very similar and “semi-randomly” assigned). In late July 2021 I was very happy to learn from Professor Su that the final results of both his and my students were very similar (my students’ examination scripts were graded by Associate Professor Hung Shuo-Ting 洪硕廷副教授 ) . This showed that my students, despite having me as a lecturer (I was not that good in biostatistics and had to rely on and learn a lot from Professor Su during the course of my delivery,to whom I am greatly indebted) who delivered my classes online, did not appear to be disadvantaged at all!
I did a quick compilation of data about my three and a half year of serving as an Associate Professor at ZQU 我做了一个关于我在肇庆学院担任副教授三年半数据的快速汇编:
The number of different classes taught = 24 [6 were Face-to-Face; 18 were online] 所教的不同班级的数量=24班 【6班是面对面;18班是在线]
The total number of students taught = 1066 [of these 786 were different individuals] 所教学生总数=1066人【其中786人是不同的个体】
The number of students taught online = 813 [of these 556 were different individuals] 在线教学的学生人数=813【其中556人是不同的个体]
“The proof the pudding is in the eating”. Feedback from students in Jul 2022 largely showed that most didn’t feel disadvantaged by taking my online classes. 有句英语术语:“布丁的好坏在于吃的过程”。2022年7月学生的反馈主要表明,大多数学生认为他们并没有因为上了我的在线课程而感到处于劣势。
The teaching evaluation exercises towards the end of each semester was taken very seriously at ZQU. While I was never the “top teacher”, nevertheless I was never in “danger” of being the lowest scorer. If you could read Chinese, you would notice that the bulk of my students in the July 2022 session who responded were giving my online teaching positive reviews. That was the most satisfying outcome for an academic, I could not have asked for more! I guess those students who like to learn would have found my online classes beneficial while those on the “muddle along” (得过且过)mode would have been very intimidated by my online delivery style.
In Part 2, “Remote supervision of students’ thesis work – a tall order” I will share my experience in remotely supervising students on their graduation thesis. Stay tuned! 在第二部分,“远程监控学生的论文工作-一个很高的要求”,我将分享我的远程指导学生的毕业论文的经验。请继续关注!
[caption id="attachment_4136" align="aligncenter" width="1017"] “The Boss” mug that served 25 years[/caption]
A simple mug that had seen usage for 25 years helps to tell a story about time management and prioritizing.
This mug has a long history! It was a gift from one of my colleagues (Johnson Mathew Joseph) when he was one of my team members when we were academic staff of the now defunct Sepang Institute of Technology (SIT).
It was around 1997. JMJ and I learned a lot from an incident on prioritizing and time management. A director of Lion’s Group (the then owner of SIT) summoned us to see him for a project at his office at the heart of Kuala Lumpur (near Bangkok Bank). We had to travel all the way from Klang town (back then with many construction works going on, Klang-KL would take at least 90 mins to drive). As parking would be expensive and difficult to find, I managed to book a college’s car for JMJ to drive and pick me up in USJ-Subang Jaya on the way (I would drive my old car home first and wait for the pick-up).
Then JMJ arranged to pick up another staff (who hitched a ride with us, she wasn’t connected with our project). That person was late, very late by all account! Unfortunately, JMJ had decided to wait for her and as a consequence we were late in arriving for our meeting by an hour. Naturally I bored the brunt of the wrath of this director as I was the Head of the School of Sciences and JMJ’s manager. That taught us both 3 great lessons:
1. Prioritizing is a core skill…. we should have ditched the hitchhiker!
2. Time management is crucial for survival in the corporate world…. I should have “ditched” JMJ and travelled to KL by taxi! However, IMHO that director could have asked us to meet him at a more mutually convenient location.
3. As a leader, I had to be accountable for my team members’ action, but after learning the lessons we should forgive but NOT forget (in case we commit the same errors again!)
The mug was used for about 25 years and it served its last day yesterday when a bit of the top rim chipped off. JMJ and I both appreciated the joke (“The Boss”) when he gave it to me as a “peace offering”. I am glad to see JMJ doing well in his entrepreneurial endeavours and wish him great successes!
Until I took up an academic position in China, it did not occur to me that the teaching profession is so respected. In fact all teaching staff, whether they are teaching primary, secondary or university students are referred to as “teachers”. For me, it felt great being addressed by my students as “teacher” when I stepped into the lecture hall at Zhaoqing University for the first time in March 2019. 当我在高校任教之前,我没有想到教师专业受到如此尊重。事实上,所有的教师,无论是教小学、中学还是大学生,都被称为“老师”。对我来说,当我2019年3月第一次走进肇庆学院的讲堂时,被学生们称为“老师”的感觉是真舒服的。
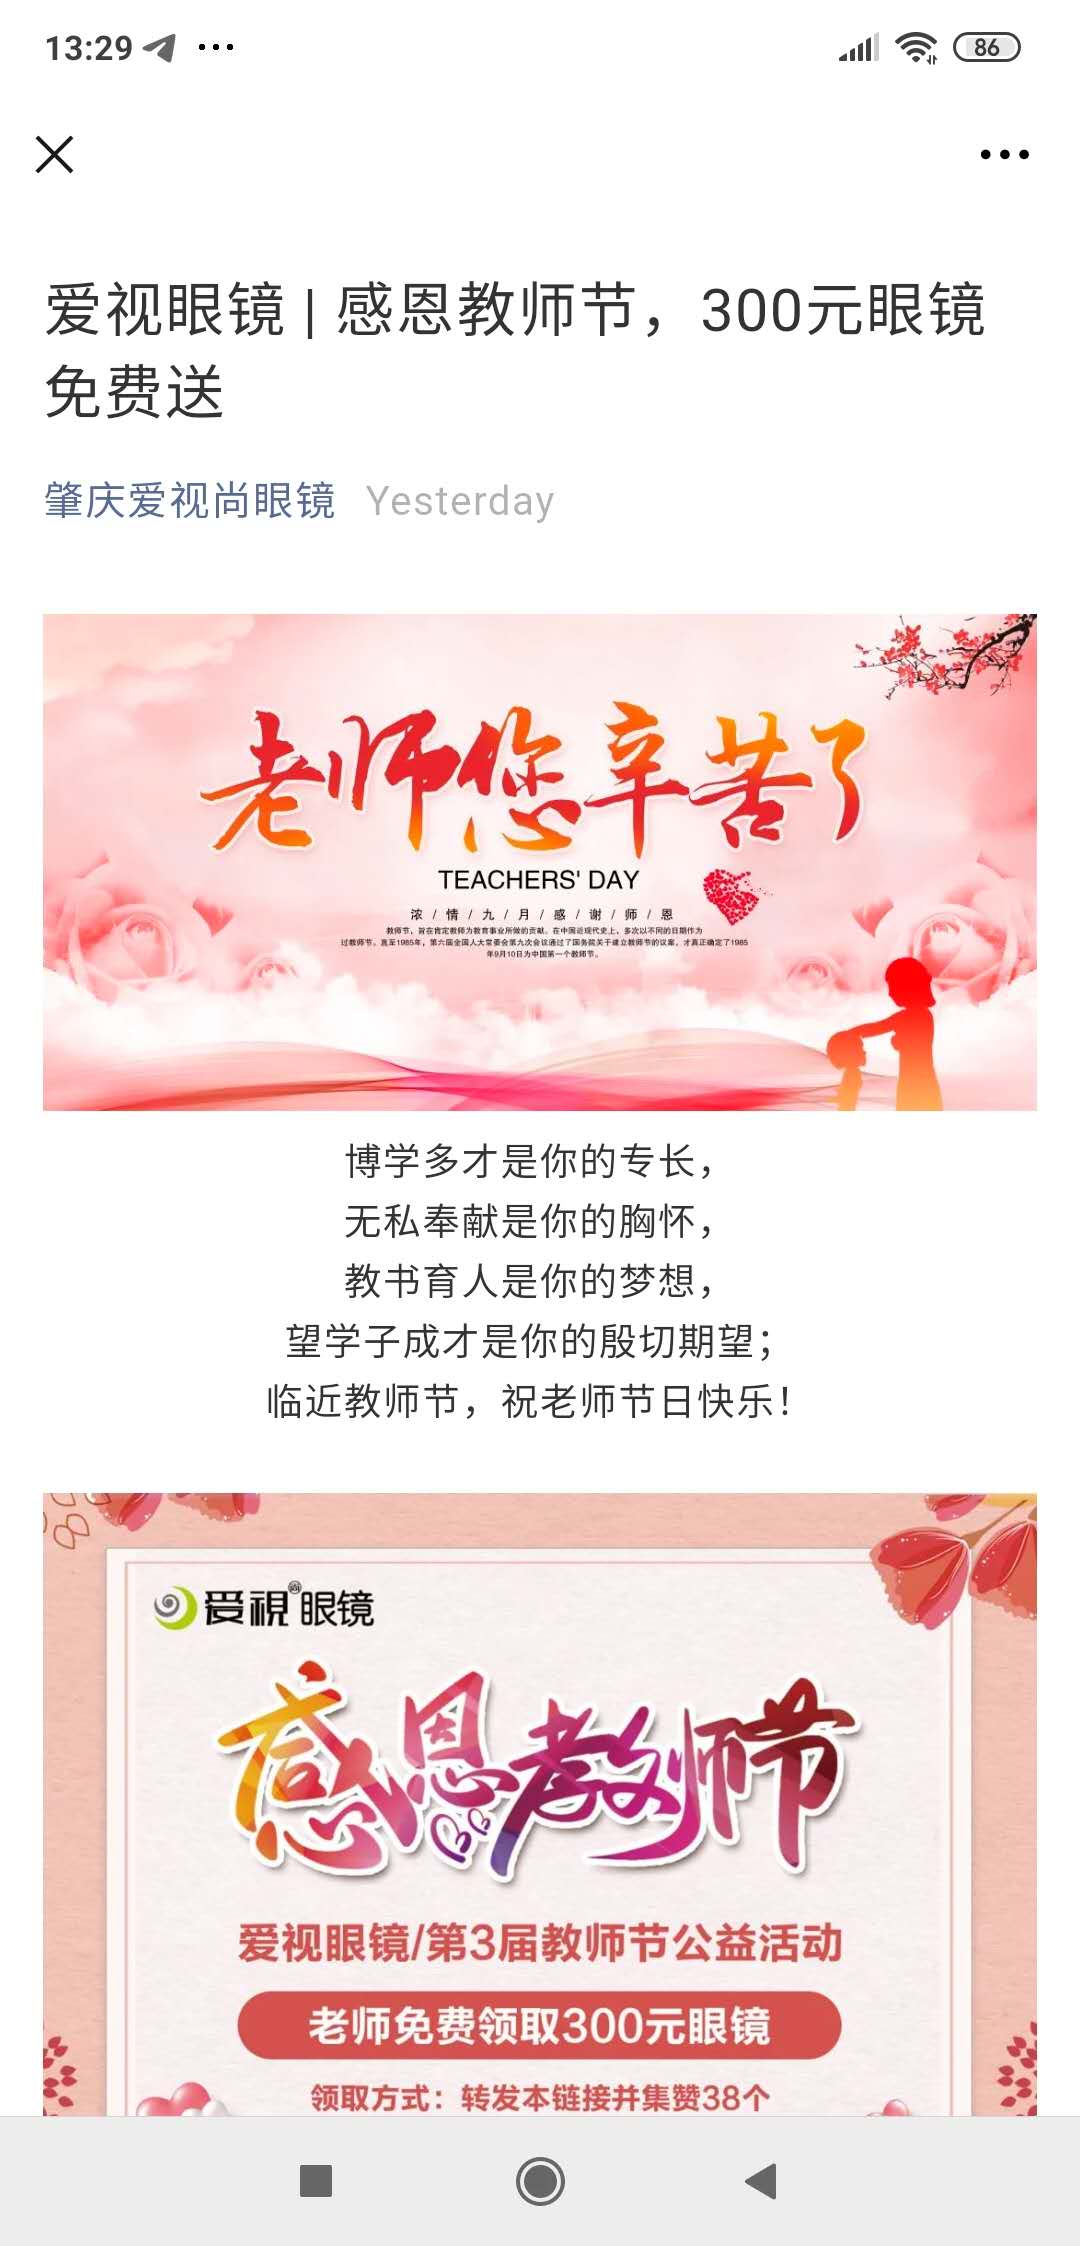
Every year during the celebration for “teachers’ day” many businesses will give special deals and gifts to teachers in China. The feature image in this post is just one of many of such signs of respect to the teaching profession. I must admit, I will miss this free gift of RMB300 worth of spectacle products this year as I am still unable to travel back to my university from Malaysia due to the COVID-19 pandemic. I have started my second semester of online teaching at the beginning of September 2020. 每年在庆祝“教师节”期间,许多企业都会向中国的教师赠送特价商品和礼物。这篇文章中的特写图片只是对教师职业表示尊重的众多标志之一。很可惜,今年我将错过这个价值¥300的免费眼镜礼品,因为COVID-19疫情关系,我仍然无法从马来西亚返校。从2020年9月我已开始第二个线上教学的学期。
It is precisely due to the respect given to teaching staff that there is a higher requirement for university teaching staff to give more attention to students’ academic performance and their well-being on campus. This is unlike the situation in Malaysia and the UK (where this author was a student for 12 years) where university students are considered as adults. Chasing after students to submit assignments and giving offenders second chances are relatively new experience to me, a veteran of the higher education sector of over two decades! 正是由于对教师的尊重,高校教师更加需关注学生的学业成绩和校园生活。这与马来西亚和英国的情况不同(作者在英国读了12年书),那里的大学生被视为成年人。追着学生提交作业,给违规者第二次机会,对我这一个在高等教育界工作了二十多年的老手来说,还是一次相对新鲜的经历!
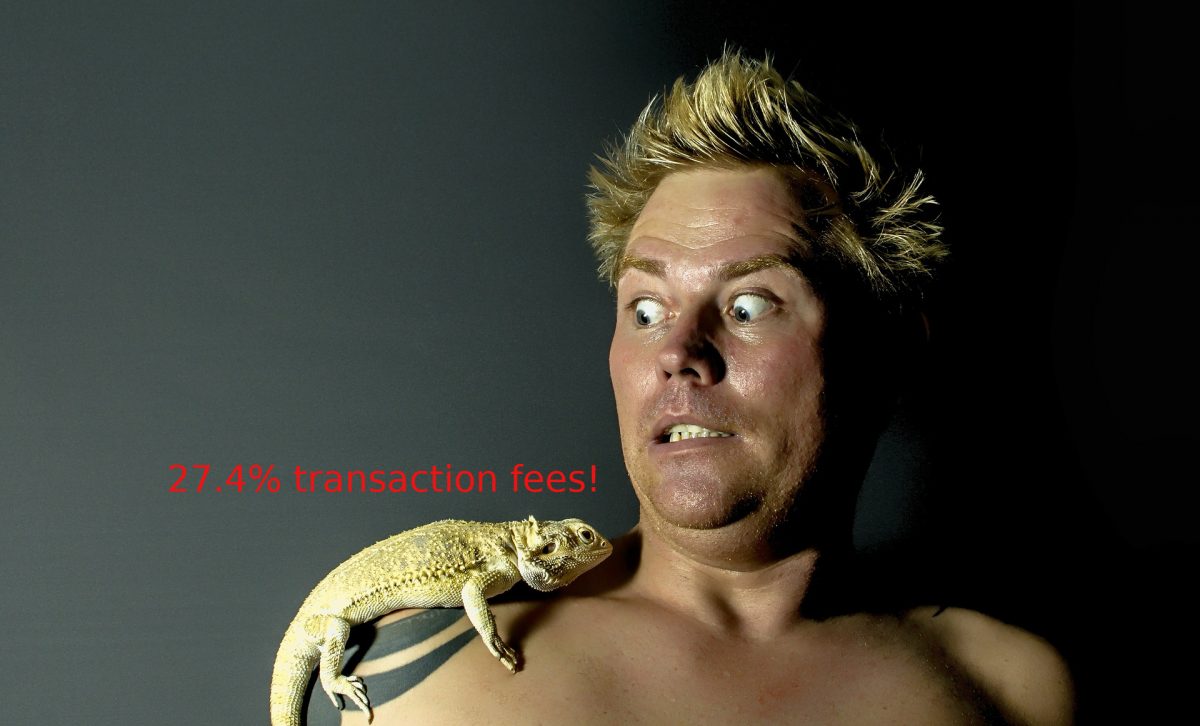
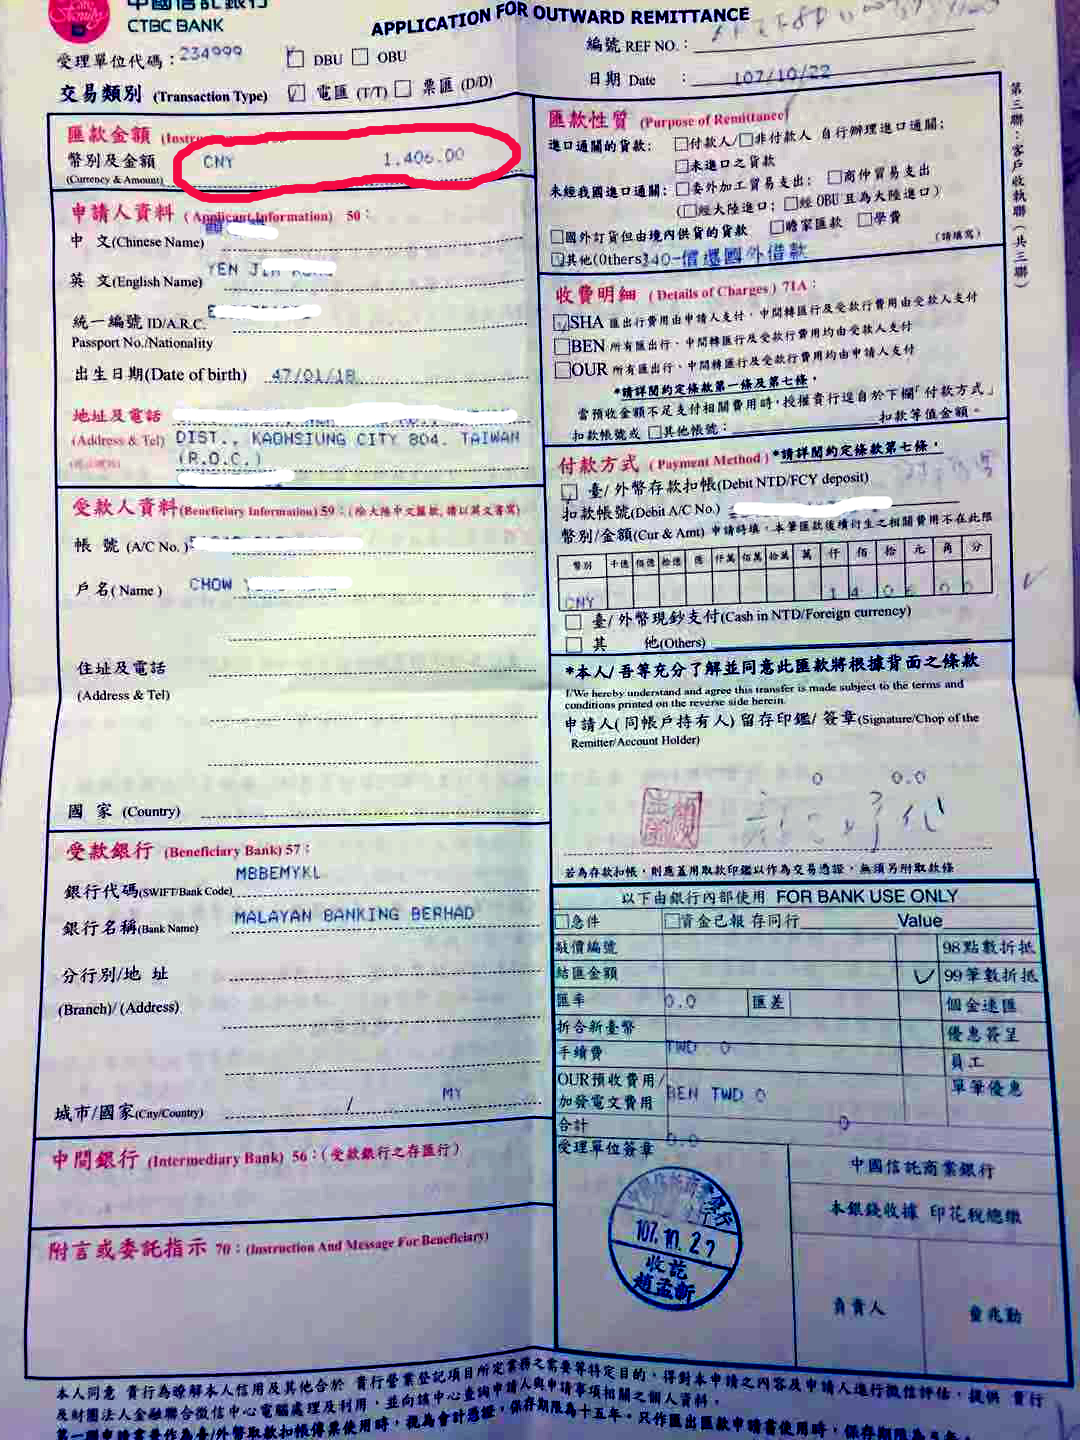
How much (as a percentage of fund) would you guess it cost to transfer RMB 1,406 from Taiwan to Malaysia using the traditional banking services? In this article I share my expensive lesson on international fund transaction using traditional banks. A staggering 27.46% of my fund of RMB 1,406 was “taxed” by the intermediary. Both the sending bank (in Taiwan) & receiving bank (in Malaysia) said that there it was not possible to find out how the intermediary levy the charges!
How much (as a percentage of fund) would you guess it cost to transfer RMB 1,406 from Taiwan to Malaysia using the traditional banking services? In this article I share my expensive lesson on international fund transaction using traditional banks. A staggering 27.46% of my fund of RMB 1,406 was “taxed” by the intermediary. Both the sending bank (in Taiwan) & receiving bank (in Malaysia) said that there it was not possible to find out how the intermediary levy the charges!
Used a traditional route for international fund transfer
As my recent trip was sponsored, I was expecting reimbursement from the sponsor for the cost of my trip. To facilitate the process, the sponsoring university in China would pool our group’s reimbursements and let the organizer of the trip, Dr. Yan to do the individual distribution of the fund received.
There was just one issue for me: the organizer and all the rest of the members of our group are based in Taiwan with yours truly being the only one located in Malaysia. Nevertheless my modest claim (after deducting the RMB 500 loaned to me by Dr. Yan to alleviate my having left my wallet at home at the start of the trip!) was RMB 1,406 (about US$202). Dr. Yan’s office was resourceful enough to use one of his bank’s “transaction fee waiver” vouchers in an attempt to keep the transaction fees down for me.
How much of RMB 1,406 would I get after being transferred to Malaysia?
At Malaysia’s end, previous experience told me that MayBank (Malayan Banking Berhad) would only levy a charge of RM5 (US$1.19) for the transaction. Of course it would have made from the spread when converting the currency into Malaysian ringgit.
Whopping 27.46% transaction fees!
Based on the exchange rate of RMB 0.59 to RM 1.00, after deducting transaction fees, I was expecting to receive at least RM 750. When the fund finally arrived at my bank, I had a big shock.
From the RMB 1,406 remitted by Dr. Yan’s office, only RM 597.70 equivalent to RMB 1,019.96 arrived at my MayBank account. The meant that a whopping RMB 386.04 or 27.46% of the original RMB 1,406 remitted was deducted as the transaction fees!
No fees levied but banks make from the spread on currency conversion
Both Taiwanese and Malaysian did not levy any transaction fees
I contacted Dr. Yan’s office and his people double checked with his bank in Taiwan to confirm that the amount transferred from Taiwan was indeed RMB 1,406. This was confirmed via the transaction slip sent to me from Taiwan. There was also no fees levied by the Taiwanese bank on the RMB 1,406.
Next, I went to my bank, MayBank to get the full details of this transfer. I was told that MayBank did not levy any fees on the transaction but the transaction report indicated that only RMB 1,019.96 was received at the Malaysian end. I was told by MayBank that they only processed the amount that was received, that is RMB 1,019.96 and it has no idea on what was the transaction fees levied by the intermediary.
I conveyed MayBank’s findings to Dr. Yan’s office which in turn also confronted their bank in Taiwan. The conclusion given by the Taiwan bank was that they had remitted RMB 1,406 and the differential must be the transaction fees (including the spreads for converting from RMB to various intermediary currencies before the final conversion to RM). To make matters more confusing, the Taiwanese bank said that it had no control over how much its intermediary would charge.
Traditional remitting equals to having no idea of the transaction cost
It then became clear to me that for traditional bank remittance from overseas, the customers really are at the mercy of the intermediaries. The remittance cost is not transparent. It thus makes this a very risky and expensive choice to remit money. And both the sending and receiving banks will wash their hands off should a customer like me getting fleeced by the intermediary (27.46% is a huge amount to levy as a remittance fee).
Better to use remittance service provider that are transparent in their fees
MoneyGram
I made a check with MoneyGram’s website to see if we were to transfer an equivalent of RMB 1,406 in US dollars (i.e, US$ 202) from Taiwan to Malaysia, with receiver paying the transaction fees what kind of scenario would happen.
MoneyGram’s transaction fees plus spread are reasonable
As shown above, if we were to use MoneyGram, I would be getting at least RM 770.49 from the RMB 1,406 or US$ 202 that were to be remitted with a fees of only US$ 15 (or RM63 or RMB105). Thus with a exchange rate of RMB 1.00 = RM 0.59, this means I would have received RMB 1,305.92. The overall remittance and conversion cost in this case would be around RMB 100.08 or just 7.12% of the amount transacted.
Western Union
A check with Western Union shows that for a similar amount in US$, the cost of transaction would be around US$10. But since Western Union also make from a spread on conversion, for US$192, at US$1 = RM3.8539, I would only get RM739.95 or equivalent of RMB 1,254.15 Thus the overall remittance and conversion costs would actually be RMB 151.85. The total remittance cost would have been 10.80% of the amount remitted.
Western Union’s spread is wider than MoneyGram’s
In both MoneyGram and Western Union cases, regardless of the total cost of the transfer of fund, the costs were pretty transparent. And even with the higher spread on currency conversion, Western Union would only have an overall cost of around 10.80% of the sum to be transferred. Of course the best choice would have been MoneyGram which has an overall cost of 7.12%.
Lesson Learned
Never use traditional banks for international remittance.
Zero “transaction fees” for international remittance is a misnomer. There is a spread when currencies are converted at the sending and receiving ends. This is how banks make their money!
Intermediaries for traditional bank remittance (aside from MoneyGrams and Western Union) do take big cuts out of your total amount to be transferred overseas!
Make sure the remittance service gives you a transparent total fees before committing to any overseas remittance.
In my case, since both Dr. Yan and I have WeChat China Wallet, it would have been better that we had explored this route where virtually there would be no cost of transaction. The only problems are: Dr. Yan needs to load his WeChat China Wallet with sufficient funds and at my end, I could only spend the amount in my WeChat China Wallet in China!
This article shares the author’s tortuous path towards getting WeChat Pay sorted during his trip from Malaysia to China when he left his entire wallet at home, with only RM15 to his name!
At the start of my recent business trip to Guangzhou, China, I discovered that I committed the grievous of all errors that a seasoned (overly organized by my wife’s definition) traveller would not have done – I left my wallet with all my cash, debit and credit cards at home! The only money I had was fifteen Ringgit Malaysia (RM15) that I kept in the casing of my mobile phone just in case I needed small amount of cash should I forget to bring my wallet when I was outside the house.
The start of the panic!
I was able to sail through immigration etc. because I had my passport with me and this was the only document (aside from the boarding pass) that I needed. Worse, I only discovered my predicament AFTER this process. By then, my wife who dropped me off in her car had arrived home from KL International Airport (KLIA). Even if she could fetch me the wallet, there would be a lot of persuading on my part to be allowed by the authorities to get through all those layers of security to meet my wife. And the clock was ticking, there was no certainty that my wife would be able to get to the airport with my wallet in time. Panic began to set in!
Transferring fund into WeChat Wallet
Then I remembered a friend from China telling me that he was able to live cashless relying only on his WeChat wallet for a week. I immediately contacted my wife to snap photographs of all my credit and debit cards and Whatsapp-ed these to me. This would allow me to “charge” up my WeChat wallet with some cash that I could use. Well that was the salvage plan.
As I already had my WeChat wallet set up and my identity verified (via a elaborate process involving snapping photographs of my MyKad and credit card), I thought adding a debit card where I could draw some cash would be a breeze. However, the debit card was only useful to you in this case if you have had authorized it to carry out internet transactions which I did not do for my MayBank debit card nor was I had any luck with my Affin Bank card. But luckily, my Public Bank debit card did have this feature switched on and I was able to upload RM500 to my WeChat Wallet. But when I tried this wallet on, all the duty-free shops (that accepted WeChat Wallet) could not transact the payment. One of the shop assistants kindly suggested that this could be due to their system being set only to accept WeChat wallet of China visitors. Thus there might still be hope for me to be able to use my WeChat wallet in China!
AliPay is of no use
I did not give up. Next, I installed AliPay app and managed to add one of my credit cards to the system. But I faced the difficulty of verifying my identity. I was instructed by the app to upload a photograph of my passport to let AliPay’s people verify my identity. But this would take a few days (today, six weeks later, I am still waiting for an update from AliPay!). Thus AliPay was not a solution for me. [Later, I Googled and found out that AliPay can only verify a bank card if it is issued by a bank in China!]
You need your physical credit card to access the airport lounge
I was hungry and remembered that one of my credit cards allowed me two free use of the airport lounge per month. So off I went in search of this lounge.
“Sorry sir, we do need the physical card to swipe and charge even if we can proof your identity with your passport”, was the reply I received when I presented my Whatsapp-ed copy of the credit card. Needless to say, my plan to use the lounge to get some food was in tatters. With my meager cash of RM15, I therefore could not take a chance to buy breakfast! I was looking forward to a proper meal on the plane! Hungry!
Free WiFi at Guangzhou Baiyun airport saved the day
To cut a long story short, I did not have to rely on my Wechat wallet for this trip. Guangzhou Baiyun airport provides free WiFi (you need to register to use). With this free WiFi, I did not have to switch on my mobile data roaming that would have cost me RM38 the instant I enabled it!
In this case I could use my WeChat identity to log on to Baiyun Airport’s WiFi. I was able to WeChat message the organizer of this business trip, Dr. Yan who happened to be at the airport early to meet the rest of our group. A loan of five hundred Renminbi (RMB 500) cash was promptly provided by Dr. Yan. This solved my cash problem as all transport and accommodation for the trip were arranged and sponsored by our host.
[I must add that, prior to that day, both Dr. Yan and I only communicated via WeChat. We’ve never met! I also was supposed to make my own way to the host university from Baiyun Airport about 100 km away, thus I would need to have at least RMB100 cash. There was no certainty that my Didi app which was linked to my credit card would work. It might not be a travel option. I did have the flight number of the rest of my group travelling from Taipei. If I did not meet Dr. Yan, and my WeChat Wallet did not work, my last resort would have been to camp outside the arrival gate with a placard to find them. Again, I had never met any of my group members before! It turned out that my luck was a bit better. Not only I could find Dr. Yan, he allowed me to hitch a ride to the host on a bus he arranged for the members from Taiwan.]
Make sure you have a credit card verified travel booking app
As I had to stay an extra night in Guangzhou compared to my other group members, I promptly searched for a night’s accommodation on Trip (an app I used to book the flights for this trip). As Trip has already had my credit card details (and verified these when I booked my flights), I had no problem getting my room at a small apartment-hotel near the Baiyun airport. [Travel tip: always have at least one of your favourite travel booking apps on your mobile phone and make sure it has all your credit card details. You never know when you will need it as in my case!]
Guangzhou’s Metro accepts WeChat pay too, but must have internet to work
To satisfy my curiosity, when I made my way to my hotel, I tried to use WeChat wallet on the Guangzhou Metro. A very nice young lady staff tried her best to help me to WeChat pay my fare. Then we discovered that Baiyun airport’s WiFi signal was too weak at the Metro station. I was not going to pay RM38 data roaming charge to carry this experiment to fruition. I went on to pay for the RMB2 fare by cash. I did have to go to another counter to have my RMB100 changed to smaller denominations that the ticket machine could accept. [Travel tip: always carry some smaller denomination Renminbi, say in RMB10 at least for public transport etc.]
How to set up WeChat Wallet for China
WeChat Wallet comes in different versions. This, I found out when I was enlisted by my old pal, SM Liew who was experimenting with WeChat’s Red Packet feature. Red Packet allows WeChat users in China to send small “hong bao” (red packet) to their friends on WeChat anywhere in the world. To get your China version of WeChat Wallet enabled, all you need is a small Red Packet from someone with a WeChat Wallet for China. The moment you accept and open the Red Packet, your China wallet is enabled!
I repeated the same procedure successfully with my son recently by sending him a RMB0.50 Red Packet, from the RMB1.00 I received from SM Liew! Of course, my son had to get his identity verified and his WeChat wallet linked to one of his debit cards first.
WeChat Wallet Malaysia version does not like rooted phones!
With RM500 inside my WeChat Wallet and having failed to use this at KLIA duty-free shops which accepted WeChat wallet, I wanted to see if I could withdraw my money to my bank account. The moment I click “Withdraw”, I was hit with this message. “Withdrawal is not supported on jail-broken or rooted mobile phone.”
Rooted phone not allowed!
A call to WeChat Malaysia’s call centre was made (on Oct 09, 2018) but I was told to screen capture the message and use the feedback system to complain to WeChat. I was promised a two-business days response, that was four days ago (this article was written on Oct 13, 2018)! I have not heard back from WeChat Malaysia since.
Feedback to WeChat, 2-business days turnaround is not true!
With this information, I can speculate that my rooted smartphone was the cause of my failure to make a payment with WeChat wallet at KLIA’s duty-free shops. So, is my RM500 stuck at my Wechat Wallet forever?
[3 hours after I published this article, WeChat Malaysia finally responded to my feedback, citing Bank Negara (Malaysia’s Central Bank) rule that rooted mobile phone cannot be used for fintech transaction as the reason. Perhaps someone from WeChat Malaysia DID read this article?]
[With the latest update (version: V6.7.3), WeChat Wallet Malaysia seemed to have “re-allowed” rooted phones to work. I was able to initiate a withdrawal from my WeChat Malaysia wallet. If the transaction can be completed, I will update it here Two working days were all it took for the transaction to withdraw RM400 from my WeChat Malaysia wallet to my bank account to be completed.]
WeChat’s multiple device sign in, a get-around for rooted phones!
Unlike Whatsapp, WeChat does allow multiple mobile devices to access it. But you can only do so one at a time. This means if you access WeChat on a spare mobile phone, yoru existing WeChat app will be signed out on the main phone. I had installed WeChat on my Amazon Kindle tablet before and using “username and password” option to sign in, I was able to access my WeChat Wallet for Malaysia and the offending message above did not come out. I can now withdraw my fund from this wallet by accessing WeChat using my Kindle!
Lesson learned and shared:
Don’t forget your wallet when you travel, especially to overseas destinations!
In case you have left your wallet at home on your trip, you should always keep one of your credit cards in your checked-in luggage [it may be worth paying the extra RM25 tax a year for this!].
Always have a passport cover. Have a small cards holding wallet or just a small Ziploc bag to house some cash and one of your credit cards or debit cards inside. Keep this Ziploc bag with your passport all the time. But remove this Ziploc bag whenever you face the immigration officer (whether at home or abroad) to avoid confusing the good official who may take this as a bribe!
Don’t rely on WeChat Wallet for your China trip unless you are going to have a) Cash uploaded to the wallet and b) mobile data roaming or a local SIM card. You cannot make use of your WeChat wallet if you do not have access to the internet in China! And it is very difficult now to get a SIM card in China.
If you want to use WeChat Wallet in China, make sure that you have your WeChat Wallet for China enabled and find a way to upload RMB into it first. Of course you must have access to the internet while you are in China.
Have at least one travel booking app installed in your smartphone. Make sure this app has verified your identity and your credit card. Even if you do not have your credit card with you, this app can still be used to make your bookings (like I did with Trip).
If you need to learn more and get updated with the latest discussion on WeChat Wallet for China, do check out this thread on Tripadvisor. For Americans, there is a fintech site, Swapsy which provides free transaction for swapping US$ for RMB on WeChat Wallet platform. Swapsy only works if you have a US ID card, so it is of no use to those without a US ID.
Problems with UNetbootin can be solved by using USB ISO image writer like Etcher where Linux Mint 19 Tara was installed well. GParted must be used with caution.
If you are keen to give Linux a try as an open source operating system to take over the running of older PC / laptops, you will need to have a good disk image writer. This is because all distributions of Linux come as iso image file that you would need to put to either a DVD-rom or more likely, a USB flash drive. Personally, I have given up on the quirky DVD-rom burning long time ago since I had discovered UNetbootin. UNetbootin is a small utility programme allow you to source for popular Linux distribution and burn the iso image selected (which is downloaded via this application) to CD/DVD-rom or USB flash drive.
I had Linux distribution LXLE 14.04 installed in my Toshiba T210 since 2014. As some of the browsers’ functions began to malfunction, especially those related to the playing of videos, and I could not fix the problem even after updating the browser (in this case Vivaldi) to a newest version, I learned that this was solely because my OS is long in the tooth!
The iso image flash was corrupted!
To get the image of updated OS burned into USB drives, I had been using UNetbootin for a long time. But after many attempts to flash LXLE 16.0.4 iso to my USB drives, I was about to give up.
These attempts included:
(1) Changing the USB drive from 4 Gb to 8 Gb…. still I was asked to put in a username and password (which I was assured by LXLE’s forum if this happens, you have a corrupted installation of the iso file).
(2) Downloading the same iso file from another site and flash it again (just in case I had got a corrupted file from the first site) ….. the same login screen greeted me.
(4) Using GParted to reformat the USB drive each time. This had the effect of completely cleaning the USB drive for another iso image to be put on it … this made no difference!
(5) Try flashing the iso file of Puppy Linux Xenial Pup to a USB drive….. this worked.
(6) I then tried out installing real Ubuntu (which LXLE is based) on USB drive as instructed by this page. But I did not check the physical requirements i.e. the USB Drive’s size before trying this out using UNetbootin. I used a 8 Gb USB drive. It of course did not work. LXLE needs at least 20 Gb of space to work!
All these problems were not seen when I downloaded LXLE 16.0.4 in early July 2018 & burned the iso file onto my 16 Gb USB drive. And I had been “test driving” LXLE 16.0.4 for weeks so that all my printer drivers, and other software that I used on the old version of LXLE could be made to function in the new OS. Hence the quirky behaviour of UNetbootin could be due to
the system updating done after the LXLE 16.0.4 iso flashing. The updating could have done some changes to the functioning of UNetbootin!
I suddenly remembered that I had seen a USB Image Writer program in LXLE 16.0.4! So I tried to use this to flash the LXLE 16.0.4 iso file to a 4 GB USB drive as an experiment. This worked! The same program and procedure were used to flash the iso file of Puppy Linux Xenial Pup around the same time.
Careful when using GParted
GParted is a great utility programme for one to restructure the partition table of one’s harddisk (or even USB drives). However, as I described below, users are to take great precaution when using this utility. Any mistakes are usually irreversible. If you mess up your harddisk partition, you are as good as having the entire hard disk reformatted, losing all the content and installed programmes etc.
I was very careless when using GParted when I thought I had the iso flashing problem solved and I could release the 16 Gb USB drive by deleting the partition using GParted. This I managed to do easily. But GParted threw up something that said that I had another 16 Gb drive… so I went on to delete this partition table again (so I thought).
It turned out that GParted mistook the 4 Gb LXLE 16.04 live USB containing drive a 16 GB USB drive. And the working OS allowed me to delete its own partition!. I thus ended up without a working “live” version of LXLE 16.04 after that! Panic!
Luckily I had the iso files stored somewhere else and could restart my work. Thus with GParted, if you are in doubt of what you are doing, you should hit the “Cancel” button and reexamine your steps etc.
Etcher is a good USB Image writer
I then went back to my 12-years-old Dell Inspiron and fired up Puppy Linux. I searched the internet for USB Image writer and found Etcher. I proceeded to download the correct version. Etcher’s installation was very simple. I just had to extract the Appimage file and click on it! Using Etcher on Puppy Linux, I was able to write the iso image of LXLE 16.0.4 again.
The next project was to install a most up-to-date version of Linux distribution (based on Ubuntu) on my Toshiba T210.
Installing Linux Mint 19 Tara over old LXLE 14.04
I had tried Linux Mint before and found out that it has a current version, Linux Mint 19 Tara (Xfce Edition that is suitable for older machines) which is based on the latest Ubuntu 18.04 LTS. I downloaded Mint 19’s iso file and burned it using Etcher to another 4 Gb USB drive. I test-driven this and checked off all my requirements e.g HPLIP set up (and working with my old HP MFP 1132 printer/scanner), veracrypt installation etc. Then I went on to replace my old LXLE 14.04 (hard disk partition SDA8!) with Linux Mint 19 Tara!
So far I am happy with what I have.
As the old Toshiba T210 came with Windows 7 which was only a 32 bits version as opposed to the hardware which can take 64 bits, I actually put in the 64 bits version of Linux Mint 19. Tested the “live USB” before installation.
With 64 bits, I feel that the old Tosh now has some added computer power. But it could be a brand new OS that has not been burdened with some older operational files. I can now make full use of the 4 Gb memory that I had installed in this old Toshiba T210!
The learning experience on installing & configuring cheap Xiaomi & Yi Technology home security webcam is shared in this article. If your are adventurous & on a tight budget, the cheaper made-for-China versions of these gadgets are for you, otherwise you should stick to the “international” version.
With the penetration of broadband internet services in Malaysia, more and more household, especially those in the urban and suburban areas now have a reasonable stable internet connection. In early 2015 when I had to relocate alone to work and stay in Penang the thought of “keeping tab” the security of my house (450 km away) came to mind.
Having a security cam “keeping an eye” on the front of your house has a lot of benefits, but I did not figure out how this could be one of the benefits: capturing wildlife visiting my suburban neighbourhood!
In this article, I share my learning experience with Xiaomi Yi home security camera (and that of a similar one from Yi Technology). This type of home security cams will capture video (& most have “night vision” aka infrared camera). Of more importance, the Xiaomi & Yi cams that I bought are setup and linked to my smartphone. This allows me to use my smartphone to access the video captured or “live feed” from these webcams that are linked to the internet via the home-based WiFi.
After fully tested my first Xiaomi security webcam for a few months, I went on to purchase 6 more sets for the university college that I managed. The new found “eyes” allowed my staff and I monitor key locations of the campus and hostel more effectively. These gadgets also put the security personnel on higher alert.
Requirements for home security webcams
The followings are the requirements of a workable home security system based on Xiaomi or Yi security webcams:
A stable WiFi network at the premises with a reasonably strong signal at the security webcam’s location. If your WiFi signal is weak at the desired location, you will have difficulties connecting with the security webcam which I think must be able to connect to the server of Xiaomi /Yi to relay the footages (either live or from the memory card).
Power supply / power socket to power the security webcam. The cable provided is about 2 metres long, you do need to have a constant AC power supply although the cam is perfectly capable of drawing its power from a mobile phone power bank. If the location of the power supply must be weatherproof, so is the location for the webcam!
A suitable spot to fix the security webcam that will capture any activities in the desired areas at the premises. The webcam will have a camera angle of at least 110 degree wide, but it is important to site the webcam at appropriate height to capture activities in the desired area. If there is a light source nearby, it will affect the webcam infrared sensor at night, thus this must also be considered. I had to turn off the “night vision” of one of my security webcams because of the interference from “lighting noise” from cars etc.
A strategic spot to locate the security cam is crucial.
If the webcam is located close to a lighting source, you can adjust the night vision accordingly.
A smartphones installed with the appropriate app from Xiaomi or Yi Technology This app is the “heart” of you entire security webcam system which you need to set up, access and control the security webcam. The same smartphone app can control more than one security webcam, provided these are of the same brand. That is, Yi Home app will not be able to control Xiaomi webcam and vice versa.
The Mi Home app looks different from Yi Home but their functionalities are very similar.
Yi Home app is a lot more user friendly compared to Mi Home.
A mini-SD card (at least 4 Gb, preferably 16 Gb) to store captured footages. Although not crucial, it is best to have Class 10 SD cards that are fast enough for the camera.
At least one home security webcam! You will need to decide on budget versus ease of use in your choice of “international” or the much cheaper “China version”. (Please refer to the section below on how to choose)
China version & international version: what are the differences?
Like many consumer gadgets, the Xiaomi brand has a lot of made-for-China only versions of the security webcams that one can get from online platforms such as Lazada. While in most cases the technical specifications are more or less the same between the China and international versions, often the interface and the firmware of China version are “locked” to China only. As there is a big difference in pricing of these gadgets, often with the China version being up to half the price of the international version, many traders offer seemingly a good bargain online.
I had purchased both the China version and international version of Xiaomi Home Security Webcams. As I understand Mandarin and read Chinese, I was able to install the app and configure the China version of the webcam, but not without some difficulties (please read on for further details on this).
The Xiaomi smartphone app (Mi Home) can smartly detect where the security webcam is located and hence if you have a made-for-China-market-only version, you will not be able to configure it to use your home WiFi. Since these security webcams need to contact (and register) with Xiaomi’s server in order to relay the video & live feed to your smartphone, if you cannot configure it, you are not going to be able to use these China version webcam.
What’s the difference between Xiaomi and Yi Technology’s security webcams?
The scene is further complicated by the fact that there are both Xiaomi and Yi Technology’s security webcams in the market that look exactly the same (and yet they are different!). A search on the Internet revealed that Xiaomi and Yi Technology are related. Xiaomi invests in many tech companies and Yi Technology is one of these. Xiaomi often lends its brand to these new tech companies to better market their products.
Personally, I find Yi Home (the smartphone app from Yi Technology) a lot friendlier to use and I had no problem in configuring my Yi security webcam using this app on my Xiaomi Redmi Note 3 smartphone. This is a far cry from the struggle I had with Xiaomi’s “China version” security webcam. But both apps have very similar functionalities, one of which is to allow the sharing of access to the webcams installed by one smartphone with other smartphone users. Thus if everyone in your family has a smartphone, in theory you can share the access to these security webcams to each of them.
Problems of sharing access with iOS version of mobile apps
While the Android version of the mobile apps (for both Xiaomi and Yi Technology) work perfectly well with their respective security webcams, I experienced a lot of problems with the iOS version (for my wife’s iPhone). In fact this sasme problem was also experienced by my former staff who also used an iPhone. However my wife’s iPhone 6 could easily accept my invitation to connect to the Yi Technology webcam using Yi Home for iOS so that she could view the feed from the webcam I shared with her, we have no luck with the Xiaomi Mi Home version!
Hacking the made-for-China-only version
Before buying bulk for the institution I managed, I purposely bought a China version of Xiaomi Security Webcam so that my then Head of IT and Campus Services, KB could test out possible solutions. KB was able to download a firmware for the international version of the same model. We copied this onto the mini-SD card of my China version webcam and inserted this. After powering up the webcam, we were delighted to “convert” the made-for-China-only webcam into an international version that could work in Malaysia.
The only caveat to this hack is that the firmware is not to be updated, ever. If not, the webcam and the Xiaomi server that it will connect to will detect your region and the webcam will be rendered inoperable. The firmware is meant for this model : Xiaomi Xiaoyi Yi Night Vision 720P HD 8MP IP Camera WiFI Home Security CCTV Webcam; it may not work with other model. There are many solutions available, one just have to use trial and error to figure out which will be the best.
So which version to buy?
If like me, you are short on budget and have an adventurous attitude (and willing to muck around the PC, smartphone and webcam), then you could consider “going cheap” and buy made-for-China-only versions that are a lot cheaper. Of course there is no guarantee that you can hack the webcam from “China version” to “international version”. But it is no rocket science. If I can do it (without programming skills), I think it is just a matter for finding the most suitable firmware.
However, personally, I will advise, for simplicity on sticking to international versions to save all the headache. There is a Mi Store selling only Xiaomi marketed products in Malaysia (I visited one in One Utama Shopping mall) which sells international version of home security webcam (a more updated version too). Although the choice of models is limited, and the price is higher than if you shop online, there are knowledgeable personnel on hand to help you. And if the webcam does not do what it promises, you can always return it!